photo HEADER2_zpsztxreyz7.png

Thursday, July 31, 2014

Cinnamon Roll Doughnuts

When I woke up yesterday I put on my sneakers and walked outside for a run...


and it was raining and cold... Then I thought to myself:

 I will make DOUGHNUTS! 

I can be so bad sometimes.  I made doughnuts from biscuits in the spring and they turned out awesome {here, here}.  I was on my Target run this week and the biscuit section stopped me dead in my tracks.  Happens all the time!  I was thinking about making doughnuts again and then I thought...why don't I try to use cinnamon rolls?  


Cinnamon Roll Doughnuts

Ingredients:

Refrigerated Cinnamon Rolls
Canola Oil

Directions:

1.   Begin to heat the oil in a large dutch oven to 350 degrees {you could use a smaller pan but it will just take longer}.  You want about 1-2 inches of oil.  Punch a whole in the middle of the biscuits with a circular object. {I used our garlic press} 

2.  Carefully drop dough in the oil.  Allow dough to cook about for about 30 seconds on each side.  You want them to be a nice golden brown.  If you're new to frying, you can test one out first to make sure you are cooking it long enough. 

3.  Use a slotted spatula to remove the doughnuts from the oil, then place on wire rack.  


4.  I heated the icing in the microwave for about 5-10 seconds to make it more pourable.  You might want to put the wire rack on a metal cookie sheet so can re-use the icing that drips off.  
  

Now I was pretty impressed with how these doughnuts turned out.  I recommend eating them right away!  The longer you wait the more they tasted just like a normal cinnamon roll {which is not necessarily a bad thing}!
  
{LJ}

Linking Up with:
Whipperberry

Wednesday, July 30, 2014

The Table that Keeps on Giving


WE HAVE INTERNET!

I know my excitement level might be a little ridiculous, but WE HAVE INTERNET... I am laying in MY BED with my computer!  I know the Starbucks around the corner is already missing me dearly.  :)  I have been working on revamping our kitchen table for the last couple weeks.  I have had this table since my junior year of college...


How cute {and young} are we???  These beautiful ladies are still my BESTEST friends!  We didn't even get how good we had it... As you can see the table started out with a light stain.  It stayed that way for a couple years until I enter my paint everything black phase.  Now I am in my "stain everything" phase.  Tall Tan Man never loved my black table, and moving it from Dallas to Denver didn't help. 


Here is how I made the transformation:

1.  I knew I didn't want to buy a table or repaint it so I went to Lowe's and got a stripper.  A paint stripper.  Day one of the transformation involved lots of paint stripper application, waiting, and messy scrapping.  

2.  A lot of the primer did not come off on day one so I went back to Lowe's to get some 50 grit sandpaper.  I have the skil octo sander and totally love it.  I sanded the table for about 4 days straight {I am a teacher on summer break what else am I going to do??}.  After I finished getting most of the paint off I went over the top of the table with 220 grit sandpaper.  This helps make the top super smooth. 


 3.  I stained the table with Minawax Dark Walnut.  I already had the stain in the garage from our new {dresser}.

4.  We did one coat of polyurethane on the entire table first.  One thing I have learned about putting polyurethane over a stained piece of furniture is that you have to sand it after the first coat of poly.  Now, don't be scared.  The sanding {220 grit} will first look like the stain color is being distorted, but it isn't.  Wipe your piece of furniture down with a damp rag, and it will look normal again.  After that we put one more coat of poly on the top to make it more durable. 


We are currently using our outdoor chairs from Ikea, because chairs are expensive...and we can't agree.  :) 

{LJ}

Linking Up With:
The Blissful Bee
Ginger Snap Crafts
Someday Crafts
Polka Dots on Parade
Seven Thirty Three

Liz Marie Blog

Wednesday, July 23, 2014

Ikea Dresser


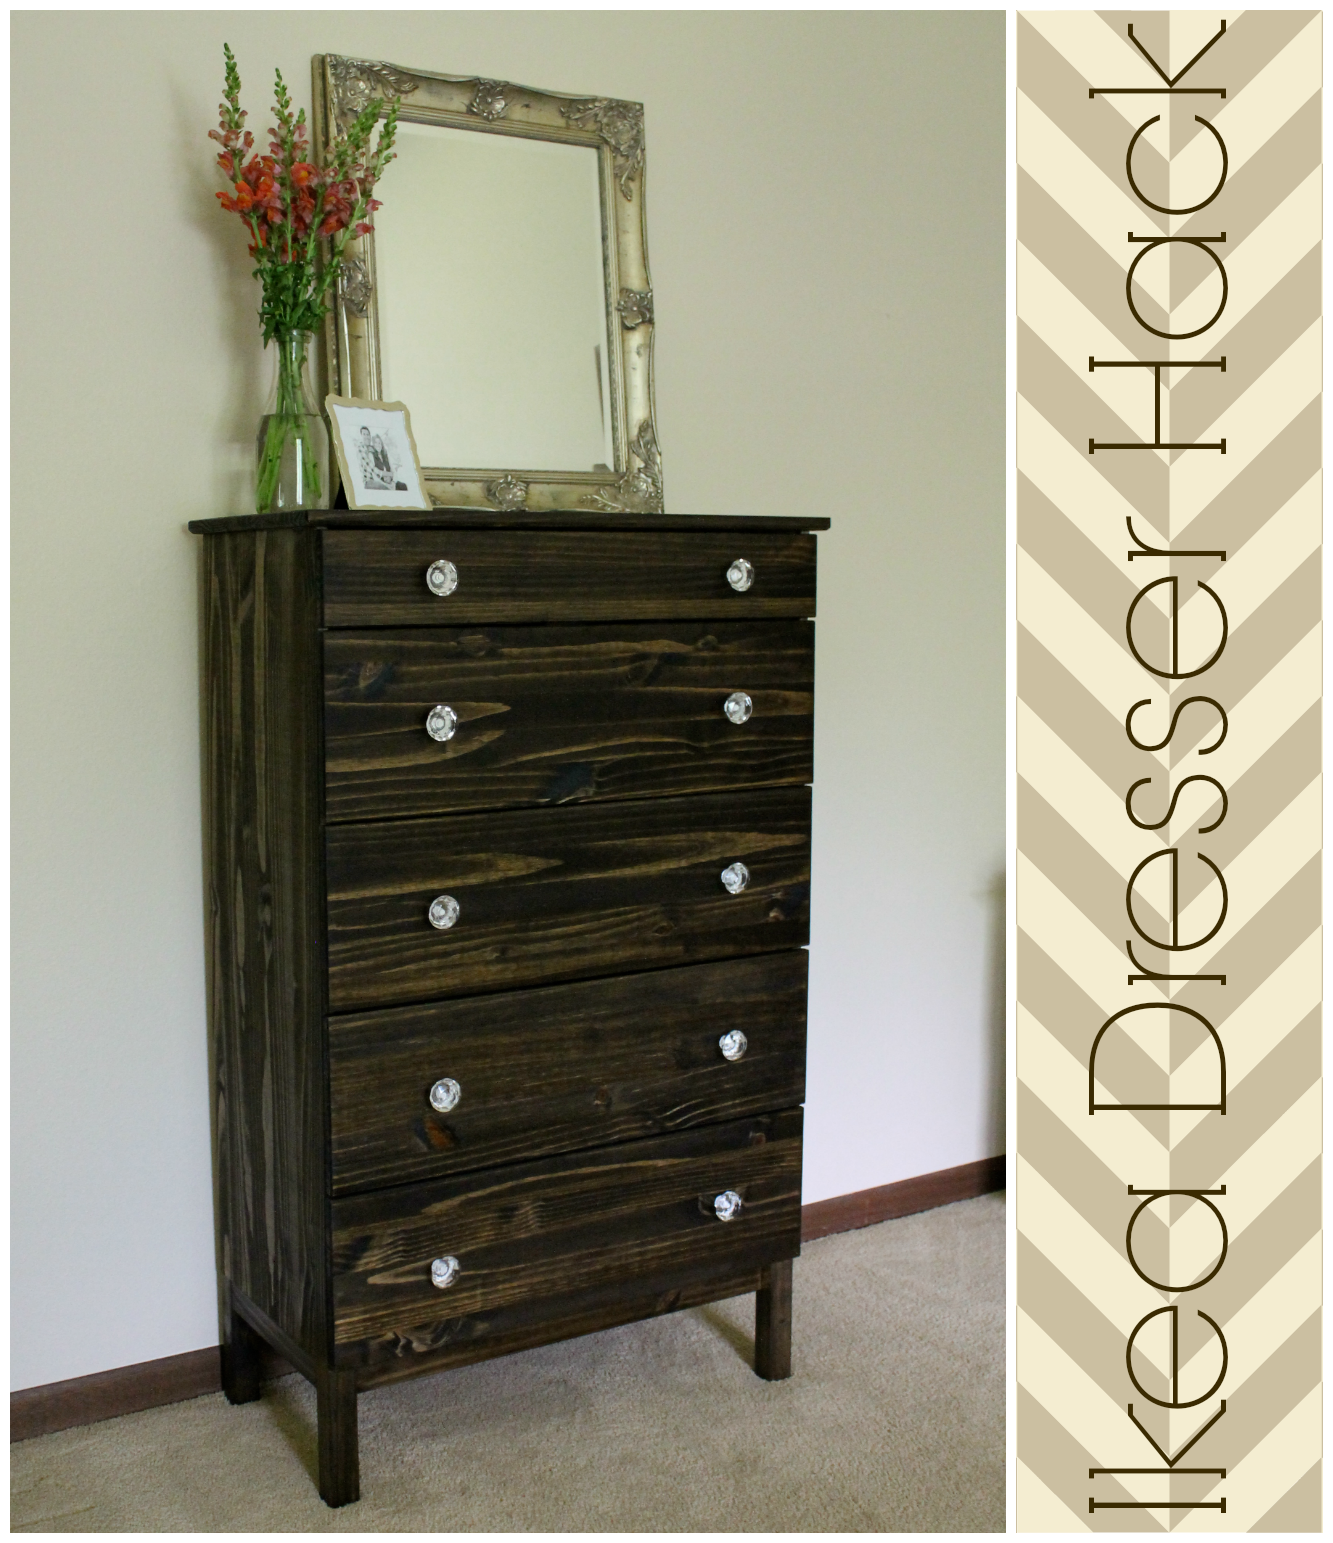
 I wrote a few weeks back about trying to convince Tall Tan Man that we needed a second dresser.  Folks, this is what victory looks like:


I got more than just a dresser...  The key to taking men shopping is feeding them BBQ first.  :)

Our {temporary home} is coming along nicely except for the fact we still don't have internet.  This has been both a good and bad thing.  I haven't been able to blog very much and stalking my favorite blogs has been a challenge {first world problems}.   I have also spent more money at Starbucks and Panera than I would like to admit... The pro is that I have been really productive because I can't binge watch shows on Netflicks... Anyway, I will digress.


 Building an Ikea dresser can be a challenge, but with the help of iced coffee and First Wives Club it was quiet enjoyable.  This dresser cost us about $135 dollars total.  The breakdown w/o tax:

$99 dresser 
$7 dark walnut stain
$2 foam brushes
$20 clear pulls from Hobby Lobby {10 pulls x $2 each, 50% off of course}
$0 polyurethane
$0 painters tape

Here is a quick how to: 

1.  Put together the dresser.

2.  Optional: Tape off the inside of all the drawers.  I think this helps make the dresser look more polished. 


3.  Wipe the dresser down with a damp rag to make sure there is not any dust on it. 

4.  When the dresser is completely dry, apply the stain with a foam brush. Make sure you wipe the dresser down with a clean rag after about 15 minutes {the messiest part}. 

5.  Once the stain has had a chance to dry completely {I waited until the next day} apply the polyurethane.  Polyurethane is suppose to need 48 hours to dry completely.  I do not always follow the rules...

6.  Screw in the pulls.  


Tall Tan Man said he was enjoying not having all his clothes all over the floor.  {he was not the only one}.  I will try to get back here on Friday and show you a couple other projects I have finished!

{LJ}

Linking up with:

The Blissful Bee
Ginger Snap Crafts
Someday Crafts
Polka Dots on Parade
 Seven Thirty Three

Wednesday, July 16, 2014

My Updated Mexican Party Dress


Hello!

I want to make something clear, I am not pregnant.  I know the picture on the left may look like I have a bun in the oven but.....I...do...not.  I have had this dress for about 10 year now, and have only worn it on an occasional Cinco de Mayo {in college}. I love the dress because of the color, details, and it was my Grandmother's {extra special}.  I wanted to wear this dress more, but when I tried it on for Tall Tan Man he yelled "I'm not ready for that!". :)


I am really happy how it turned out! FYI I did not DIY this.  I don't trust my sewing enough to make clothes.  I hope you enjoy the rest of your week!  
{LJ}
 

Friday, July 11, 2014

Homemade Oreo Ice Cream


I love anything made from sugar.  This is not one of my best qualities, but from the wise words of Lady Gaga "baby, I was born this way".  After getting our kitchen all unpacked this week I decided I needed to put my ice cream maker to use.  I made {The Perfect Vanilla Ice Cream} a few summers ago and decided to spice things up with Tall Tan Man's favorite only dessert he likes to eat, the Oreo.   


Oreo Ice Cream

Ingredients:

2 cups half and half
1 cup whipping cream
2/3 cup sugar
1 tsp vanilla
3 cups of chopped oreos
 
Directions:

1.  In a medium sauce pan bring half and half, whipping cream, and sugar to a slight boil {medium heat}.  If you have a candy thermometer this is 170 degrees.  Stir occasionally and be careful not to burn the mixture!

2.  Remove from burner and stir in the vanilla.  

3.  Allow mixture to cool slightly before placing it in an air tight container.  Refrigerate overnight {or about 4 hours}.  Also, make sure you are taking proper steps to get your ice cream maker ready.  I have to freeze mine overnight.

4.  Make your ice cream according to your ice cream maker directions.  With my machine it takes about 17ish minutes to make the ice cream.  I added one cup of oreos at about minute 15, and stirred in the remaining 2 cups of oreos by hand.    
 
5.  Place the ice cream in a freezer safe container, and freeze for about 8 hour before serving.  If you don't have this much time your ice cream will still taste phenomenal, but it wont scoop perfectly {i love ice cream soup}. 
 
 
 This ice cream is so yummy!  


Happy Friday ya'll!  I hope you have a wonderful weekend! 

{LJ}

Linking Up with:
Shabby Nest
What About
DIY Vintage Chic

Wednesday, July 9, 2014

Home Sweet Home

Hi ya'll!  I can't believe how fast the summer has flown by...  Time flies when you're having fun and when you're moving {which is not fun}.  All of our things are finally in our new temporary home.  It just took four days, and approximate 67 trips up and down 3 flights of stairs.  If you are a new reader Tall Tan Man and I have been looking for our first house since Valentines Day weekend and have had absolutely NO luck.  After a few May melt downs and fights we decided it was time to take a break from looking at houses.  Our apartment complex had already leased our apartment, and that meant we were in a bind on where to live.  We had two options; 1. Find a new apartment and lease it for only 6 months {cons: rent for shorter periods of time is stupidly more expensive}  2.  Move into Tall Tan Man's Gpa's empty house {cons: reeeeeally far from where we work and my new gym that I am obsessed with}. 

We chose option two because rent was a lot cheaper {cough, free} and we wouldn't have another stressful deadline on finding a house.  Living in a rental has it's challenges for someone that loves decorating.  There are lots of things I would love to do to the house {floors, paint, kitchen updates} but this is not something that can be done.  I also have to respect that this was my Grandfather In Law's house for 31 years and he doesn't want a lot of things changed.  

Here are some current pics of our house, along with things we still want to do.  I am sorry it is a mess, but I was more ready to show you our progress than clean...

The Living Room


  • Hang {these} pictures
  • Figure out window treatments
  • Get Tall Tan Man to clean up the cords on the floor
  • Maybe add some color with a fig tree
The Kitchen

  •  Update the table {strip the black paint, possible get a new top made}
  • Find all new chairs {there were four before Tall Tan Man dominated two of them}
  • Paint kitchen cabinets, take down upper middle cabinets that make it hard to see into the eating area, and replace all appliances.  A girl can dream.  
The Entry Way

  • Repair the wood floor where double stick tape used to be
  • Accessorize the entry table
Our Bedroom


  • Make new throw pillows {too much white right now}
  • Window treatments that aren't a blanket duck taped to two rods tall enough to cover the windows.  My husband is so creative.
  • Find a big mirror to go above the dresser
  • Recover the white chair in the corner
  • Convince Tall Tan Man that it is time we get a second dresser.  Once victorious, stain our new dresser and add new knobs.
Guest Room 

  • Find Bedding
  • Add bed skirt, blanket, and throw pillows to make bed look more chic than country.
  • Find a place for Tall Tan Man's guitar
  • Update {this} headboard
  • Repaint Dresser
  • Repaint Nightstand
Office


  •  I don't know where to even start...  This room is last on my list.  
Alright, I don't know if this post was more for you or for me!  Hope you are having a fantastic week.  I have a brisket in the crockpot and homemade ice cream in the freezer.  I'd say I am doing just fine. :)

{LJ}

Monday, July 7, 2014

Hola!


Tall Tan Man and I just got back from a little vacay to Pueta Biairta, Meh-he-co {Puerto Vallarta, Mexico}!!!  We had so much fun getting away together!  We considered this our honeymoon because we didn't get a real vacation after our wedding {going to Austin, TX for 3 days was nice just not honeymoon nice}.  This was the view from our room: 


Turns out July is rainy season {I was freaking out} but the clouds were usually gone by lunch everyday {phewww}.  We had never traveled together before so we did a couple things that I would of never done.  Example One.  When we got passed customs I am used to putting my head down and walking as fast as I can passed all the sales people.  Tall Tan Man had a different idea.  He wanted to see if we could get a good deal for something...


This picture was from our nice sales meeting at a hotel that was much nicer than our own.  It ended up being a good situation because we got two cab rides {to/from downtown} and tickets to an awesome show called The Rhythms of the Night.  And we didn't spend the $21,000 to get the 25 year package deal...  


 Our favorite activity of the trip was going to The Rhythms of the Night.  This show was so fun because it was on a secluded beach and the dancers were very talented.  They were trained by the same people that do Cirque Du Soleil {that's what Eddie our sales guy told us, so it has to be true}.  The show was very entertaining, but if I am being honest I couldn't follow the story line...I am sure this is because I was more focused on if I could do a summersalt without letting my butt hit the ground.  After the show we had our best dinner of the entire trip!


Overall the trip was great.  I am not sure we would go back to the same resort {my stomach did not like the food} but Puerto Vallarta was beautiful. Here are some other pictures from the trip:


{LJ}

P.S. All these high quality photos were taken with my iphone.  Am I the only one too nervous to bring my nice camera to Mexico?

P.S.S.  We don't have wifi in our new place yet so I am doing all my blogging from Panera.  Which means I don't have my proof reader...or my couch...and there are a lot of cookies here...

P.S.S.S.  I will be back later THIS WEEK to show you our new place. 

P.S.S.S.S. I can't wait for the Bachelorette tonight.  Are you excited?!
Related Posts Plugin for WordPress, Blogger...