photo HEADER2_zpsztxreyz7.png

Tuesday, August 30, 2011

Bathroom Decor and Organizing.

This was the first room in my apartment that was decorated.  Probably because it is the smallest room...All the other rooms are only half {or maybe a third} of the way done.  It might have been smarter to just pick one room and dive in...but I didn't.  I am to A.D.D. for that.  Back to the bathroom, I love organizing, I love wicker baskets, and I love chalk board paint.  I also love to ramble.  Here are the before pictures of the bathroom...


Complete chaos.  Here are the newly organized shelves.


A little bit of an improvement :)


I bought the towels at Home Goods.  Wicker baskets can be a little pricey, but found all three rectangular baskets for only $20.  Normally it would cost close to 36 bucks...and that is just silly.  I found these in Tulsa at a store called Gordmans.  We do not have these in Dallas.  I have also seen these baskets at Ross, T J Maxx, and Marshals for similar prices.


The two baskets on the bottom are from Ikea.  $10 each.  Perfect for my light and darks.  {I love how I put a comma after wonderfully made in the picture above...}


Decorating with books is something I do often.  These are old readers digest books my Grandmother had.   I also made the chalk board platter, and you can too with my TUTORIAL!


I got these jars and plate from Walmart. This idea is from my good friend over at Joyfully Created.

I still have 2 more projects for the bathroom.


I want to add some fabric to one of my towels to keep out on the rack.


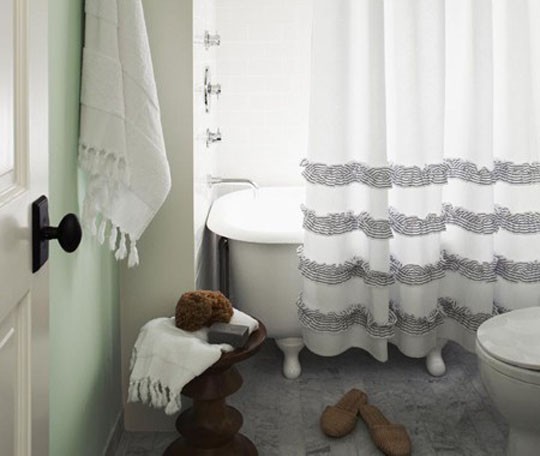
This shower curtain is SO cute...I need to break out my sewing machine!

Happy bathroom organizing and decorating!

{Leslie}


Sunday, August 28, 2011

Cinnamon Pita Chips

BEWARE!  These will make your house smell like Christmas, and yummy goodness.  I am practicing some strong will power at the moment not to eat anymore. 

The Goods:
  • 4 Pita Pockets
  • 6 TBSP of Butter
  • 1/2 cup Sugar
  • 1 TBSP Cinnamon


Pre-heat oven to 375.  Cut up your pita pockets into chips.  I made Garlic Pita chips HERE, and there are directions showing you how to make them.


Mix sugar and cinnamon together in a bowl.  In another bowl, melt the butter in the microwave {about 30 seconds}.


Dip the pita bread in the melted butter, and then drag in the cinnamon and sugar.  Place chips on cookie sheet.


Bake at 375 for 8 - 12.  8 minutes will create not really crispy chips and 12 will create very crispy chips.  You have to be careful to watch your chips, because cook time depends on how thick your pita bread is!  I think these would be great for breakfast while they are still warm.  I thought they were good cool, but I loooooooved them warm {kinda of like my addiction to Starbucks Skinny Cinnamon Dolce Lattes}.  Enjoy and have a happy Sunday!


{Leslie}

Monday, August 22, 2011

PW Pulled Pork with Skinny Girl Margarita

This post is a long time coming...I made this for my Tall Tan Man before his occupation took him to New Jersey a few weeks ago.  I googled the town he is in yesterday, and found out he is in the city with the second worst crime rate in the USA.  That is pretty hmmmm...scary.  If he wasn't so large and intimidating I might need to fly up there to protect him.  Anyway...Pulled Pork.  This is a PW {Pioneer Woman} recipe, and it is fabulous.  I would of never though of making this with Dr. Pepper!!!


I added cilantro, bell pepper, cheese, and guacamole to my pork.  YUMMY.  :)  You can find the PW recipe HERE.  I have some left overs in the freezer that I can't wait to use in BBQ sandwiches.  With our my pulled pork burrito I wanted to try The Skinny Girl Margarita.


It was pretty good (or mediocre).  Definitely not the best margy I have ever had though...maybe calories make margaritas better {stinks...}?  Hope y'all had a great Monday!

{Leslie}

Saturday, August 20, 2011

Kitchen Table Chairs

Finding 4 perfect chairs that could be upholstered was no easy task.  I looked everywhere.  Trying to be a good DIYer, I was patient and kept looking in every goodwill, flea market, and antique shop I would see.  Finally, I found these beauties...


You might be thinking that this chair is not beautiful...but do you remember Ann Hathaway in Princes Diaries before her make over??  Have some faith.  I wish I had a true "before" picture, but when my Granddad saw these chairs he began taking them apart and re-gluing all of them...I only thought they needed a little work {sorry for my phone picture, Granddad did want to waste time}...


I guess I was wrong {sigh}.  This is what the cushions looked like when I got the chairs.


I discovered this navy floral fabric when I took off the nappy plasticey fabric.  It was prettier, but still not my style.  I almost vomited when I discovered what was under that floral fabric.....I don't really want to talk about it....Lets just say, it might of been made up of 100 years of dust.  I was pleased to see that the seat was still in good condition. This is what I used to recover the seats:
  • 4- 15 by17; 1 inch foam {Hobby Lobby}
  • Quilters Batting
  • Staple gun
  • Fabric
I first sketched the seat onto all the foam pieces.


Then I cut my quilter batting two inches wider and taller than the seat. I then stapled the batting to the back. Make sure you pull your batting as tight as possible.  I found it easiest to work from the middle of one side of the seat, alternating back and forth to the other side. Can you see the chaos behind me?  Moving takes a lot of work...I don't think I put make up on {or maybe even showered} for several days...


Now onto the fabric....I looooooved the blue damask pattern I found at Joann's.  I stapled this on using the same technique as the batting.  BAM.  I was glad to be done with my TABLE and chairs.  I painted the chairs exactly the same as I painted the table.  You can find my instructions Here


I love the fabric :)


{Leslie}

Wednesday, August 17, 2011

Chalk Board Paint {obsession} Platter

I have a new obsession...Ikea frozen yogurt.  Is it weird to go there just to get yogurt?  Mmmmm. I need to stop thinking about that, or I really might go there right now.  My other new obsession is chalk board paint.  It is SO cool!  I have been painting a lot of random things around my house with it.  I found black chalk board spray paint at Hobby Lobby.  I also found different colors of chalk board paint at Joann's. 

Over this past weekend I was standing in my bathroom, and was at a loss on what to put on one of the shelves.  Thankfully, my "Do it Yourself" magazine had the perfect idea!  While unpacking one of my boxes I found this. {I had not seen the content of this box in 2.5 years. It was like Christmas.}


I had already placed this silver platter in my garage sale pile.  I am sorry if it bothers you that I am spray painting silver...I am sure I could of found something cheap at goodwill, but this was free and the perfect size.  Before starting the project I cleaned the platter with silver cleaner.  Next using painters tape, and I ripped a bunch of short pieces.


I lined the center of the platter one piece at a time...


I finished lining the entire center, then covered the outer edges.


Spray paint the entire platter.  Make sure you spray about a foot from the surface, or you will get ugly paint build up.


I allowed paint to dry completely before taking off the tape.  I love the new addition to my shelf!  Fits pretty perfect!


What are you wanting to paint with chalk board paint?


Looking around my apartment I have a couple more ideas...I'll be sure to keep y'all posted!

{Leslie}

Monday, August 15, 2011

Kitchen Table Upgrade

Moving has been CRAZY!  Somehow in the move I misplaced my camera cord, or I would have posted this earlier.  I have been going nonstop...ikea, unpacking boxes, rooms to go, painting furniture, Lowes, upholstering, more painting, back to ikea...With all the other purchases I was making I didn't want to spend money on a new table.  This is my old college table {I miss college} that I decided to fix up:


There are a bunch of scrapes on the top of the table {pretty sure this is because one of my roommates was playing quarters on it...haha}.


I used the steps from Young House Love on how to paint furniture.  Before I did any painting, I sanded the table thoroughly.  This helped to make the top of the table more even.  Here are the 3 leading ladies that helped me make over the table. 


{1}  Apply the oil based primer.  I found it best to use a Purdy paint brush.  It was more expensive, but well worth it!  Allow primer to dry completely.  It was waaaaaaaaay too hot in Texas to paint outside!!!


{2}  Apply paint.  I used a latex paint that was black, and had a semi gloss finish.  I had to use 3 coats to get the look I wanted.  Here are three things I made sure I did: paint in thin layers, allow paint to dry completely before re-coating, and sand down drip marks and other mistake places {of course, paint over after}.


{3} Sealer.  I used a water based poly {minwax water based polycrylic}, because I knew the table would get a lot of use.  This stuff is very temperamental...be careful with your brush strokes {trust me}.  You will be able to tell if you paint in different directions.  Do not over brush during this step.


My table isn't perfect {and neither is my floor...I somehow managed to also lose my broom in the move}, but I am happy with it.  I love my new chairs too!  That post will be coming asap! I am really excited about all my crafting and decorating.  It has been hard to sleep at night, because I am feeling so inspired! :) You can laugh at me if you want {trust me I do it all the time}!!!

{Leslie}

Monday, August 8, 2011

No Bake Cookies


What do you do when you want to make cookies, but have a pork butt in the oven {yes, I said pork butt}?  You make no bake cookies!  These are some of my favorites...probably because they have chocolate and peanut butter in them!  I found the recipe Here on food network.  I made a boo boo, and didn't make sure I had all the ingredients before I started cooking.   Instead of using 2 cups of sugar I used 1/4 cup sugar, 1 cup brown sugar, and 5 truvias.  :) I was a little weary about doing that, but it worked!  The flavor is pretty awesome; maybe even more awesome than the "normal" recipe.

The Goods:
  • 2 Cups Sugar {or 1/4 cup sugar, 1 cup brown sugar, and 5 truvias}
  • 4 TBSP Cocoa
  • 1 stick of Butter
  • 1/2 cup of Milk
  • 1 cup Peanut Butter
  • 1 TBSP Vanilla
  • 3 cups Old Fashion Oatmeal
Using a large sauce pan place all the sugars:


Add the cocoa....yum!!!


Now, add the butter and milk. 


Cook at medium-high, and allow to boil for only ONE minute.  Take the pan off the heat, and add the last 3 ingredients.  Stir until well combined. 


Using a tablespoon, scoop out your cookies onto wax paper!


I think I need to go to the gym again today, because these are too good to not eat 10 of them {stop judging me...I have only eaten 6 :) }!  Hope y'all are enjoying the summer {and staying hydrated}.  I can't believe my teacher summer is dwindling away {sigh}.  Make sure you enjoy some sweets this week!   

{Leslie}


Thursday, August 4, 2011

Moving out of my parents house {again}

I wondered if I should write this post, because I am slightly embarrassed that I lived with my parents until I was 25...After college I moved back to Dallas for work, and it made sense to live at home "temporarily".  My temporary stay turned into two and a half years...Life was easy living at home, but it is time for me to grow up.  Time for me to pay my own bills and buy groceries be independent.  :) The day I got home from my Bahamas trip I began moving.  It was 108 degrees outside...I bet your jealous.  Here are some pictures of my apartment before anything was moved in {for some reason I only took pictures of the living room/kitchen/dining room/craft area...must of been the 108 getting to my head}:


Really excited about this...


I love it!  Interior design is something that I love.  I cannot express how excited I am about decorating!!!  During my stay at my parents house I might of redecorated my room five times.  There is only so much you can do in a 12 by 12 ft room.  This is the chaos that my apartment is in right now....


My project list has about 15 items on it right now, and it is ever growing.  These are a couple projects I plan on doing:

Painting my current table {mine will be black}.  This is a tutorial from Young House Love I am planning on using. 


I have already cut wood to make this headboard {right side}!!! I found this on pinterest!  If you have not experienced pinterest you are missing out.  Big time. 


Okay, just one more project.  I could just keep showing you ideas I have found, but we would be here all day.  I want something similar to this on my patio.  Mine will obviously have to be much smaller...I found the tutorial on Prudent Baby.


Keep an eye out for my decorating projects!  Hopefully it will turn out beautiful, because my inner decorator has been pent up for 2 and half years!

{Leslie}
Related Posts Plugin for WordPress, Blogger...