photo HEADER2_zpsztxreyz7.png

Thursday, August 30, 2012

My New Boot Shelf!


All I can say is "FALL, I NEED YOU!"  I long for jeggings, scarfs, being cold, hot lattes, and my beloved boots.  Fall is by far my favorite season for fashion.  I think it is because I love layering, and comfort.  A couple weeks ago I went up to visit my Grandad, and asked him if he would help me make a "boot" shelf for my closet.  Normal, right?  Although I did help a lot he was the mastermind, and did most of the work.  I did manage to get a paper towel sucked into the sander which almost caused the engine to overheat.  These talents are something I am seeming to perfect the older I get.  He did an awesome job executing my design, which has helped maximize my closet space.  


I really loved how it turned out.  :)  There are extra shelves for fitness stuff I don't use, and my white shoes that I already put away for Labor Day {#southern}.  If you are wondering how I get my boots to stay up right it is pretty simple...


I love being organized!  This might sound really shallow, but after looking at my pictures makes I gotta say...my ankles are not as big as the pictures portray....


Sorry if that was shallow {I would bet $50 that I over analyzed that}, but I couldn't help but show you.  I hope you are staying cool, and you have a great three day weekend! :) Oh yeah...


{Leslie}

Sunday, August 26, 2012

Life. Eh.


This might be the longest I have gone without posting.  I'm sorry...  I have been suffering from the summer ending blues.  I am thankful that I have had a summer break for the past 20 years, but the time has come to get back to work.  For some reason my brain has turned into mush, which has made it challenging to be creative for the blog {or if I am being really honest...I don't even turn my computer on}.  It is strange that when I am working and a million times more busy, I am more motivated to cook/craft/clean/shower/workout...  

I'm sorry this is a lame post, but it is all I got.  :( 

If you think about it, say a prayer for a teacher tomorrow.  For some reason I am scared of my freshman, but not the seniors.  I can't believe most of my seniors were born in 1994.  They have never even heard of Hansen.  Weird.  

Have a fabulous week!  I will most likely be on my couch a sleep by 7:45 every night...

{Leslie}

Thursday, August 16, 2012

Snickerdoodle Cake


 Well hello there!  If you are a sucker for cinnamon this cake is most definitely for you.    I am unfortunately a sucker for everything sweet which dictates my time on a treadmill.  I will gladly add 10 minutes to my workout to eat an extra sliver of cake {I bet it should really be 20 but whose counting?}.  I first had this cake many years ago, and it came from my Cake Doctor Cookbook.  You should definitly check out the Cake Doctor, she is awesome!  I love it!  I followed the cake batter closely, but took out some of the butter/milk out in exchange for yogurt.  I still loved the cake. The icing is the real star of this cake.  Beware you might have a stomach ache from your inability to stop licking the bowl...


Cake Ingredients:
  • 1 box white cake mix
  • 3 eggs
  • 1 cup milk {I used 2%}
  • 1/2 stick butter {room temp}
  • 1/4 cup plain greek yogurt
  • 1 tsp vanilla
  • 2 tsp cinnamon

1.  Grease 2 - 8 inch cake pans, and preheat the oven to 350 degrees. 

2.  Using your mixer, combine everything from the cake mix to Greek yogurt.  Make sure to scrape down the edges, and mix until everything is well combined. 

3.  With mixer running add vanilla and the delicious cinnamon.  {I prefer to keep the mixer running, if this cause you to have a panic session just stop the mixer and add ingredients}


How beautiful is that?!?


4.  Equally distribute batter into cake pans.  Do not fret.  This cake will rise A LOT. 


5.  Bake for 18 - 30 minutes or until the cake tester comes out clean.  The original recipe said 25 - 30 minutes, but thankfully I set my timer for 20 minutes.  The cake was probably done at 18 minutes.  :)


6.  I wait until the cake is cool enough for me to touch before I remove from them from the pan. 


Aren't they pretty?  Always a sweet victory when the cakes come out clean!!!


7.  Allow cake to cool COMPLETELY {time to practice patients} before you ice.  I'm not joking.  COMPLETELY.  Do I need to say it again? haha just kidding.  Well, I'm not kidding about the cooling just the yelling.  :)

Icing Ingredients:
  • 1 1/2 sticks butter {room temp}
  • 5 3/4 cups powder sugar
  • 4 - 5 TBSP milk
  • 1 1/2 tsp vanilla
  • 1 1/2 tsp cinnamon


1.  Mix butter until it becomes light and fluffy.  

2.  Add one cup of powder sugar and one TBSP milk at a time.  If your icing seems to liquid-y then don't as much milk.

3.  Add vanilla and cinnamon.   Mix until well combined. 

Alright it is time for my extremely amateur tips on icing a cake.  I think I see a cake decorating classes in my future.  I put a little dab of icing in the middle of the plate to hold the cake down. 


I ice the top of the bottom one first. 


Fill in the gaps. 


Next I ice the top then the sides.  

ooooooh


aaaaaaaah


Have a great Friday and weekend!  

{Leslie}

Sunday, August 12, 2012

i WORKOUT top


Hey guys!  Sorry I have been a little MIA lately...I have been "busy."  Weekend trips to Houston, Austin, and visiting my Grandad has made my time alone few and far between.  All this traveling is about to end when I go back to work {sigh}.  I see people {elementary school teachers} on facebook spending hours in their rooms...high school teachers just don't roll that way.  Thank goodness.  No offense or anything.  This summer has been great for my workout routine.  I have been trying to hit the gym as much as possible, but my motivation while I'm there ebbs and flows sometimes.  :)  The Olympics have totally motivated me {am I the only one??}.  I am that girl on the treadmill that is pretending to race the Jamaicans to the finish line.  I win of course...  I was looking through my workout tops I wanted something new, but I knew I shouldn't spend any money.  I had seen this idea on {blogilates}, and was in love.  I will walk you through how I made it, and hopefully it is helpful.  :)  I would use a bigger-ish {long} t-shirt, mine was a little smaller than I would of liked.  This just makes it harder to make the neck line look normal.  Also, you may want to try this on a shirt that if you mess up its okay.  Just in case...Alright, you will need:

  • T shirt {BOOMER SOONER}
  • Scissors
  • Sharpee
  • A workout top you already own

1.  Lay your t-shirt perfectly flat.  Make sure that it is centered or your shirt will be uneven. 


2.  Right above the seam cut the bottom off .  Don't loose this fabric you will need to use it!


3.  Using a tank top you already own {or you could eyeball it} line the sleeve up with your t shirt.  If they are different sizes then lay the tank top as best you can.  Using your Sharpee, lightly trace the arm hole on one side then the other side.  *Make sure you leave 2ish inches from the outside seam of the neckline.


4.  Cut of sleeves.  


5.  Turn your t shirt over, and you can use the back of your tank top to trace {this just helped me get the general shape}.  You are trying to make the back have a razor back shape.  You will end up tying this so don't stress too much.  I had to cut a couple times to get it just right.  


6.  Cut the collar off.  


7.  Place workout tank on your t-shirt to help make the neckline.  Cut this a little deeper, because when you tie the tank in the back it will pull it closer to your neck {you don't want it to look like your wearing a bib}. 


You might want to go ahead and try your tank on to make sure the neck line is looking okay!


8.  Turn your tank over and cut a deep V.  


9.  Alright.  Remember when you cut the bottom off?  Take that strip of fabric, and cut the seam off.  Using the fabric that is left over pull down on the fabric until is rolls up. 


10.  Tie a knot 3 or 4 inches from the top, and start winding the string around razor back.  Be sure to pull string tight!


Tie a knot at the bottom once you feel like it :) Cut of left over fabric on top and bottom.

11.  Last step!  Try your shirt on and make sure you like the way it fits!  You can still cut some more if you need to.  I made two shirts in an hour, and it was waaaay easier the second time. 

oh one last step...Go get your sweat on!!! 

{Leslie}

Friday, August 3, 2012

Book Pages Wreath


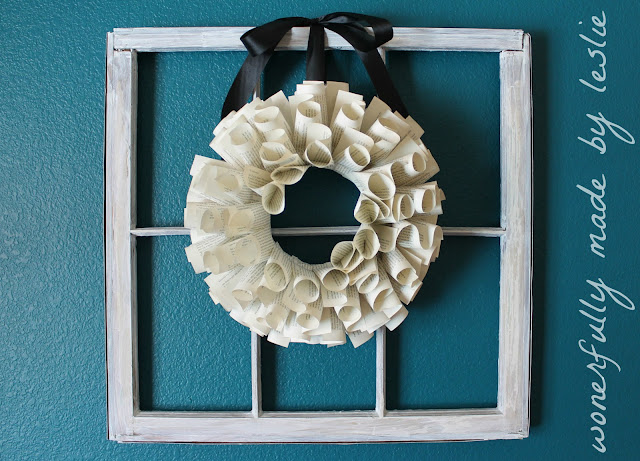
Hi my name is Leslie, and I am addicted to making wreaths.  This past year I decided wreaths are not just for Christmas, and they do not have to be limited to just doors.  I have been looking for a fabulous mirror to put above my bed, and had not been able to find one I loved.  I bet you know where this is going... I made a wreath instead!  I found this wreath on {Jones Design Company}, which is a blog I am obsessed with!  I am not going to do a full on tutorial, because JDC's tutorial is awesome.  The only part I found confusing was how to twist the paper, and I will show you how I did it.  This is a great project to make during the Olympics.  I have realized I can't just sit and watch, because I get too stressed out.  USA USA USA!!! I really wish I would of lasted longer than a summer in gymnastics, but I just couldn't handle the structure of it.   I didn't enjoy being sent to timeout, but they foam pit always seemed to call my name...  That's when my parent decided I needed soccer.  Alright, project time!  To make this you will need:


12 inch foam wreath, old book, scissors, hot glue gun and hot glue.  I love that this wreath is so cheap, and cute too!  

1.  Rip the paper out of the book {a ton}.


2.  Roll the paper like this:


Then flip the paper inside like this:


3.  Now follow the Jones Design Company {tutorial} on how to finish. :)  


I looove how my wreath turned out.  My bedroom decor is almost done!  I will be sure to show you pictures once I am happy with how it looks.  No promises on how long that will take.  :)  Have a great weekend!  I am headed to Austin with my parents and brother.  I look forward to my first food truck experience!  


{Leslie}

Wednesday, August 1, 2012

Chalkboard Plates {wall decor}


I am obsessed with chalkboard paint...  This is nothing new to my home decor, and I can't get enough of it.  I am trying to use what's left of my summer to "finish" decorating my apartment {it is a never ending process}.  The back to school signs are everywhere, and make me want to burst into tears.  I am sure if you work year round, you do not want to hear about my summer ending woes.  Anyways, my bathroom was in need for a little more love, so I made these chalkboard plates:


I found these plates at World Market {I am obsessed with this store}, and have seen many similar at Ross/TJ Maxx/Marshall's.  I am not going to do a full on tutorial, because I have one you can follow {here}.  The only difference in that project is if you want the plates on a wall.  Your safest bet would be getting plate hangers.  I used gorilla glue and ribbon...They have not fallen yet {7 days and counting}, and I do not think they will.  I will be sure to update if they do! This is just in case you choose my super professional way. :) If you want to see any more of my bathroom decor you can click {here}.  The only project I have left for my bathroom is making a ruffled shower curtain like this one:


I love it!  Hope your having a great week, and staying cool!

{Leslie}

Related Posts Plugin for WordPress, Blogger...