photo HEADER2_zpsztxreyz7.png

Thursday, March 31, 2011

Baseball & Breakfast Pastries~Cinnamon Scones

Sean was recently assigned to the Rockies AA team The Tulsa Drillers.  I am so excited for what this season has in store for him!  We are going to be practically neighbors (4 hr drive is nothing…) I am going to take advantage of my weekends and do a bunch of traveling to see him pitch. 

I find it very difficult to visit him with empty hands.  If you only knew how many times I have been stopped at airport security..."I think it is a loaf of bread...bag check."  This always makes me laugh!  I have been looking for an excuse to make these PW Sweet Cinnamon Scones.  Sean would rather me bring steak, ribs, or potatoes...but…uh…um that does not “travel well” (pastries are much more fun!)  If you have not spent time on the Pioneer Women’s website you should.  My pictures pale in comparison to hers but if I don’t practice I will never learn! 

The Goods:
•    3 cups All-purpose Flour
•    ⅓ cups Sugar
•    5 teaspoons Baking Powder
•    ½ teaspoons Ground Cinnamon
•    2 sticks (1 Cup) Unsalted Butter
•    ¾ cups Heavy Cream
•    1 whole Egg
•    1 teaspoon Vanilla Extract
•    1 cup Cinnamon Chips

Topping Goods:
•    ½ cups Sugar
•    1 teaspoon Ground Cinnamon
•    1-½ teaspoon Heavy Cream


 Preheat oven to 350 degrees.

Mix together flour, 1/3 cup sugar, 1/2 teaspoon ground cinnamon, and baking powder.

First cut the butter into TBSP pieces.  Add butter to dry ingredients and use a pasty cutter to combine.  If you do not have one use a fork!  Cut in the butter until mixture resembles coarse crumbs.


Stir in the cinnamon chips (it is impossible not to snack on these).  In the recipe, Pioneer Woman said she found these next to the chocolate chips.  I went to Whole Foods, Walmart and Tom Thumb and they did not have them. ☹ I checked online for stores that would carry them but I didn’t have much luck either.  I thought I was going to have to order them online but I wanted to make them NOW!  I am so patient (sarcasm).  Luckily, I called a good friend’s mother and she had some (random, I know.)  I will keep looking around because I now owe her 1-cup of cinnamon chips (I'll post where I find them)! 


In a small bowl combine cream, egg, and vanilla extract. Pour into flour/butter mixture, stirring gently with a fork to combine.


Turn onto floured surface and carefully press together.  This was very messy for me...I had to work the dough for a while to get it all to stick together.  You could use a rolling pin but I like using my hands. 

I formed the mixture into a large rectangle.   The recipe says you can make a circle also. 


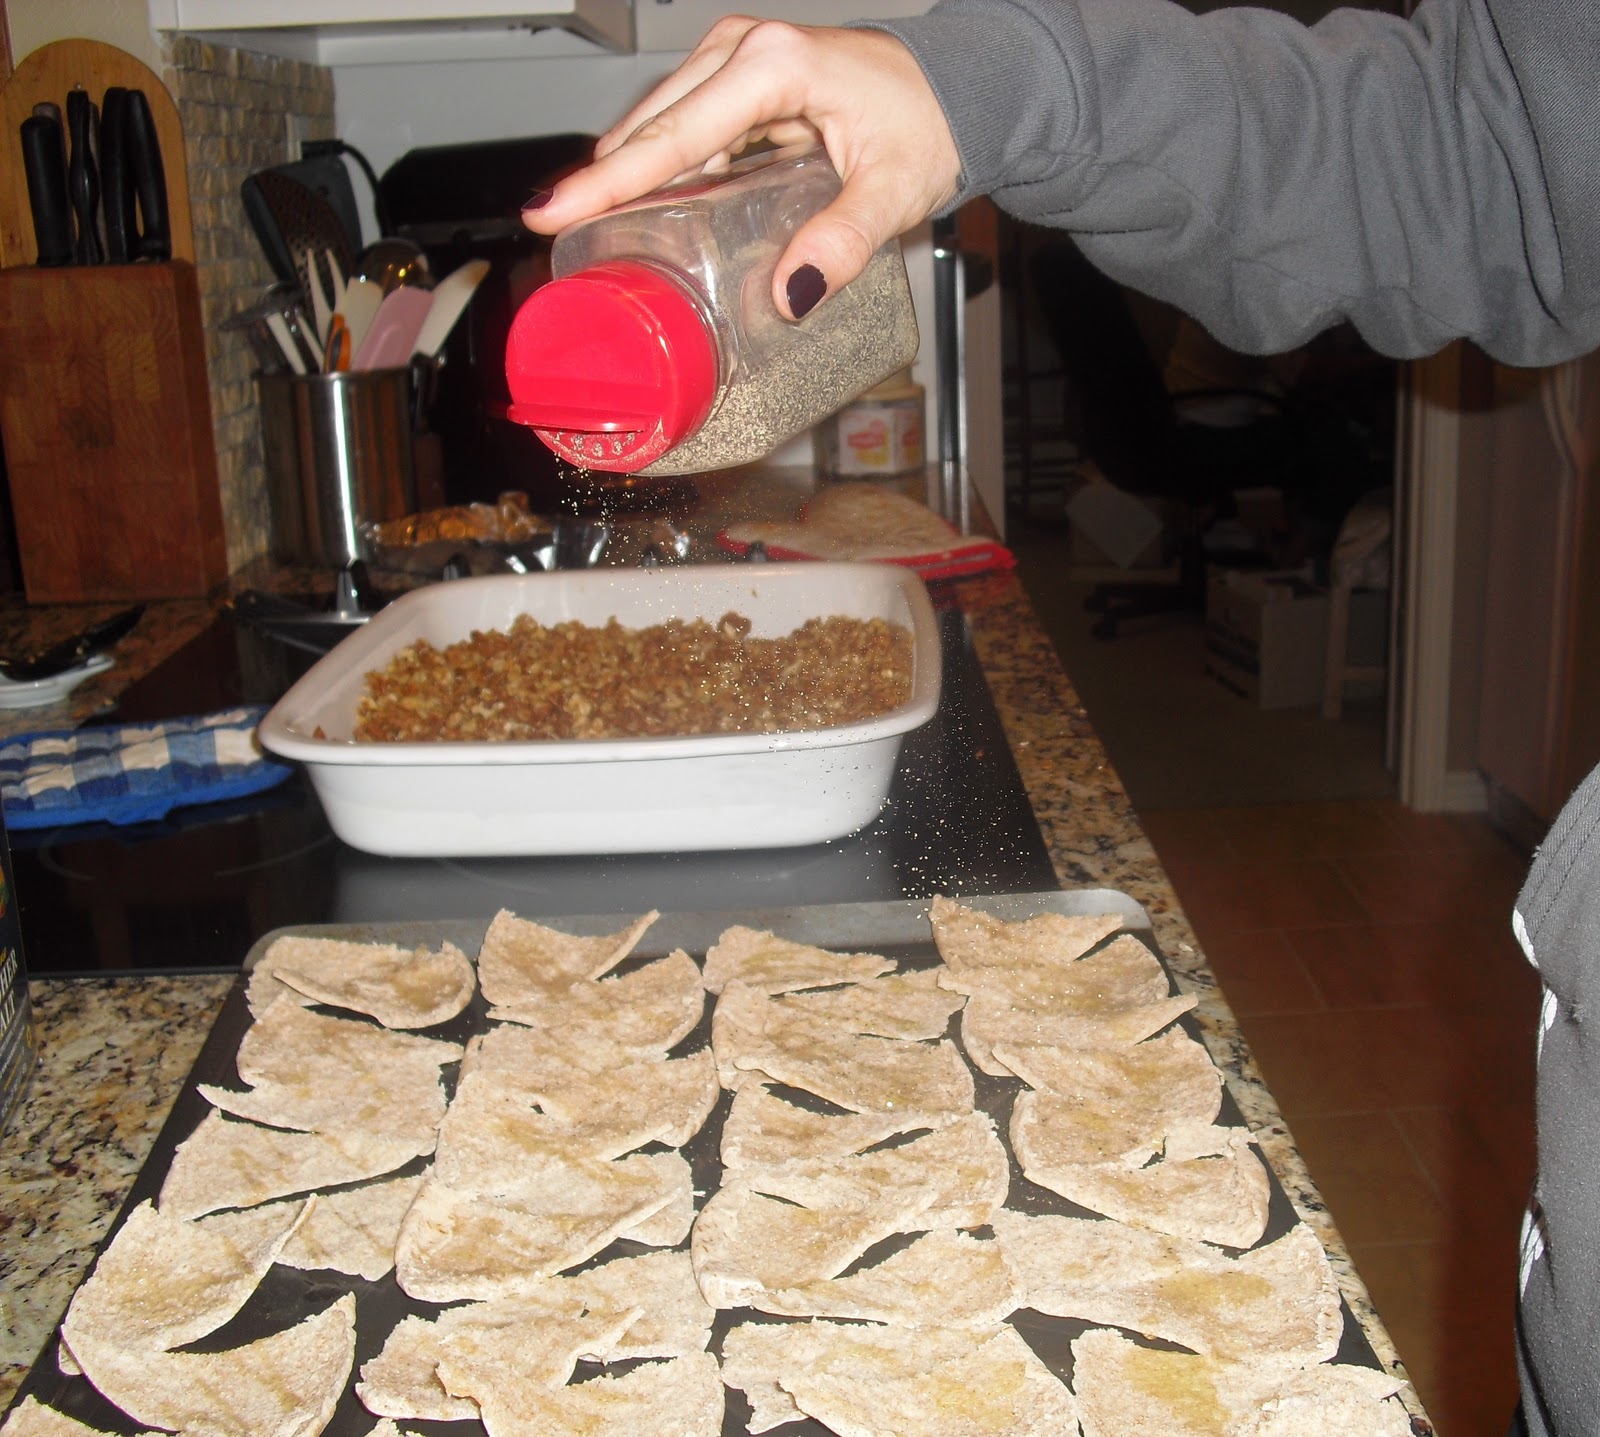
Mix together topping ingredients, stirring with a fork. Sprinkle over the top of the dough, lightly pressing.  I wish I would of pressed my topping down more.  When baking I usually double toppings because I like a TON.  I didn't have to...Pioneer Woman and I speak the same language.


Cut into triangles and transfer to a cookie sheet or two. Bake for 20 to 25 minutes.


Allow to cool completely before you serve them.  Enjoy!        


Grace, peace, and be sure to enjoy some sweets!

{Leslie}

p.s.  I had 10 post in one month...I wonder if I can do that again.  :)

Tuesday, March 29, 2011

Sarah's Southwest Chili

I was looking at the 10 day forecast this weekend and Tuesday seemed pretty chili oops chilly-yes a high of 63° is cold for Texas in March.  There are not too many meals that I can remember the first time I ate them. I can remember the first time I ate this, probably because it is incredible.  Sarah is one on my greatest friends and we were roommates during college (BOOMER SOONER). 
She made this for all the roommates during our sophomore year and I remember her coming home with tons of groceries. I grew up with the basic chili that only had 3 to 4 ingredients.  Don’t get me wrong I LOVE a basic chili on a chili cheese dog…taco salad…but this new chili recipe rocked my world. 

The Goods:
  • 1-2 lb ground beef (when making for Sean I use 2 lbs)
  • ½ medium onion, diced
  • 1 envelope ranch seasonings
  • 1 envelope hot chili seasoning
  • 1 (15.5 oz) can-black beans
  • 1 (15.5 oz) can-pinto beans
  • 1 (15.5 oz) can-kidney beans
  • 1 (15.5 oz) can-corn
  • 1 (15.5 oz) can-diced tomatoes
  • 1 (15.5 oz) can of water

In a large Dutch oven (or just a pot) brown your meat with your chopped onions.  I usually wait until the meat is somewhat browned to add the onion.  After the meat is cooked pour off the excess grease.  Mix in your 2 envelopes of seasonings. 


Open all your cans and pour into the same Dutch oven (easy clean up). Do not forget to add the can of water!

Simmer for at least 45 minutes and stir occasionally. 


I hope you enjoy this as much as I do!  This is something I make every other week in the winter and occasionally during summer (I crave it year round).  I had to make more pita chips (previous post) because the ones I made last week were devoured.  They were wonderful crumbled on the top of the chili.  Yummy!!!

Grace, peace, and be sure to enjoy some sweets!

{Leslie}

Monday, March 28, 2011

The Cactus League


One of my greatest joys in life is spending quality time with my studly man, Sean Jarrett. I feel very blessed to have someone in my life that won’t judge me for my insane dance moves and terrible singing voice (I tend to sing very loud while driving…well, now that I think about it I also dance).   He travels frequently for his job and because of this, I get to visit some really awesome places.  His career is something I admire and am floored that he is able to do what he does.  I love when he is really filthy and makes the pearl fall off the table.  I bet 98% of the people that are reading this are thinking, “what is this weirdo talking about?” (especially if you are a woman)  Sean is a pitcher, and not the kind of pitcher that you put sweet tea and lemon slices in. Four years ago I knew nothing about baseball and now I think I could be a baseball sportscaster (one of my dream jobs…).  Here is a quick lesson: a pearl is a baseball and when some one says the ball falls off the table that means it was a good curve ball.  Also, pitchers always want to be filthy.  I got to be in Phoenix for a week of spring training and had a fantastic trip.  I really did nothing…which is a beautiful thing.  For some reason I forgot to take very many pictures.  Here is a recap of my trip :)

Wake up...go for a run/hike and try not to fall of a cliff or run into a cactus.  This scenery is a little different from Dallas.


Pool time!  The pool was wonderful and so empty/peaceful.  I guess I was so relaxed I forgot to make sure my foot wasn't in the picture.


Baseball time!  Sean was able to back up the MLB team twice when I was there.  I got to visit the Oakland A's and the Rangers facility.  It was pretty weird cheering against the Rangers! 


With some of our free time we hiked Pinnacle Peak.  Pretty sure I was the only one enjoying this...Sean was drooling over all the golf courses we could see from the top. 


Do you see the golf course in the background?  Here is the view from the top.  God always amazes me with his creation, this Texas girl does not see scenery like this very often. 


The trip was wonderful.  I cooked only once and made PW Chicken Parmigiana.  I definitely recommend it.  It look all of my strength to not have seconds.  Sadly though, I still haven’t found anything that has knocked Sean off his feet (which drives me crazy).  I feel very comfortable making desserts, sides, and appetizers.  There is just something about main courses that I have not completely mastered.  Someday I will find something he loves…If you have any fool-proof-manly recipes let me know.  He is definitely a meat eater!


Grace, peace and be sure to enjoy some sweets!  


{Leslie}

Thursday, March 24, 2011

My Two Sides - Appetizer Style

This post is very random, but to be honest...that is me, completely random.  I like to think I am a healthy minded person but also a big part of me relates to Paula Dean and her love for butter.  We are having a birthday party for my good friend Kelli and she requested a “dips” party.  I could not decide what to bring until I was skimming through POP SUGAR on Tuesday.  If you do not have the POP SUGAR app on the iPhone I strongly encourage you to get it RIGHT NOW(there is also a web version for you non iPhone people).  My favorite sections are the yum sugar, fit sugar, and casa sugar.  Yum sugar had posted a recipe for Basic Whole Wheat Pita Chips from Katie Sweeney.  I have never made chips before but I am a believer that making food is much cooler than buying it.  Here is the recipe:

The Basic Whole Wheat Pita Chips                                                  Serves 8-10

The Goods:
•    1 bag of whole-wheat pita bread
•    Olive oil, for drizzling
•    Salt and freshly ground black pepper, for sprinkling
•    Garlic powder
Preheat the oven to 375°F

•    I cut each piece of pita bread in half down the middle. Stick your fingers in between the top and bottom layer of the bread and separate the two halves. Repeat with the other side of the pita so you have four thin pieces of pita bread.

•     Slice into triangles about the size of chips. Transfer to a large baking sheet.

•    Repeat with the remaining pita breads, spreading the chips in a single layer on the baking sheet.  Good thing I have a convection oven because I had to use two trays.   


•    Drizzle with olive oil and season generously with salt and pepper. If desired, add garlic powder and any another seasoning to spice things up.


•    Bake until lightly browned and crispy 12-15 minutes. Let cool and enjoy.


Now you can’t have chips without something to put on them (even though I am pretty sure I already ate half of this batch...oops).  So I have satisfied my healthy side by making Whole Wheat Pita Chips…I need to satisfy my other side (lover of butter…cheese…sugar).  Cheese balls are usually only served during Christmas parties but you better believe that this recipe is so good you will need to make it year round.   You are probably thinking, “this woman is crazy, I would never eat a cheese ball with Pita Chips.”  I am crazy.  My fabulous Aunt Shelli created this recipe; she is someone I have always looked up to.  She has inspired me over the years to cook and has introduced me to some amazing recipes.  Enjoy!  

***Adjustment:  My friend made these with a thinner pita bread and she burned her first batch :(  She only had to bake her chips about 8 minutes! Make sure you watch your chips on the first batch!

Ranch Cheese Ball                                                     
Servings depend on level of self-control.

The Goods:
•    2 (8 oz) packages cream cheese, softened
•    1 (8 oz) shredded cheddar cheese
•    1 package ranch seasoning
•    1 Cup Chopped Pecans


•    Combine first 3 ingredients in mixing bowl.  Mix. Scrape the walls of the bowl and mix until well combined.  You want to make sure the ranch is spread evenly throughout.  


•    Place on saran wrap and roll into a ball. Refrigerate for 30 minutes. 


•    Roll cheese ball in chopped pecans and store in airtight container in the refrigerator.  I am not sure how long it last because it gets eaten up fast in my house!  


Grace, peace, and be sure to enjoy some sweets!

{Leslie}

Tuesday, March 22, 2011

Oh Boy, Baby Shower Invitations!

After many Google searches for baby invitations I discovered that there was a ton of options but none that would be perfect for my wonderful cousin-friend, Meghann.  I was blessed to be a part of Meghann and Shaun’s wedding last year and I am so excited for this new adventure.  From my Google search I was able to gather a ton of ideas that got me really excited.  I was able to get the basic idea of the onesie but none of them were as unique as I wanted it to be. 
Here are the invites I made!  I tried to make a “how to” tutorial ☺ It is my first!

I first bought all the paper at Michaels (go wherever the paper is on sale!).  I bought the 12x12 card stock paper because it was the perfect color of crimson.  I also bought a pack of black and white card stock (40% off coupon).  Before I go any farther, I will warn you that I worked on these over a couple of days to make sure I wouldn’t get burned out and do a crappy job (is crappy a blog appropriate word?).

Stage One-Making the Stencil
I first experimented with different onesie shapes. I wanted the invite to fit in a 5 by 7 envelope so I first cut out a 5 by 7 sheet of computer paper.  I then folded it “hot dog style” and traced what I wanted the onesie to look like.  Keeping the “hot dog” style I cut out the shape.  I did this so everything would be symmetrical. 

Trace 2 onesies side by side on a piece of card stock and cut it out (yours doesn’t haven’t to be as cute as mine…I was experimenting).  To make sure the front and the back were the same I folded down the middle and cut looking at just one side.  Now you have your form! 


Stage Two-Cutting out all the onesies
Using pencil, trace your form on all your scrapbook paper of choice (tedious…I know). 

With my paper cutter I cut out the edges of the invite.  I am pretty pumped about making something with the left over paper (future post…I think yes!) 

This is important, using an edge fold the paper over and use the plastic end of the scissors to make a clean fold.  Cut out the invites and erase all stray pencil marks.  They are already cute!  If you notice, all these pictures were taken outside because I am a believer of multitasking.  Sunbathing and crafting!


Stage Three-Making the back
I think if I had a Cricket this would be MUCH easier (note to self: buy a Cricket…any suggestions on which one to buy?). I first printed the mommy’s last name on white card stock, cut out the name, and backed it with black card stock.

Making the 11’s was a little more tedious.  I first printed them on white card stock and cut them out individually. This time I backed with white card stock to make the 11’s pop. 

Stage Four- Making the front
I created this elliptical shape (fancy math word for an oval, I teach algebra 2) in word.  In order to make it look like a uniform I added tiny stripes on the sleeves.  I found it easiest to make them a little longer and cut off the excess paper.
I thought the buttons were going to be difficult because I wanted them perfectly straight.  I realized that using a piece of paper with tick marks made it a cinch!  I put drops of glue next to the tick marks and placed the buttons down.  I am sure the roommates were glad when this project was done because the onesies were spread out all over the floor.   I was very careful so that they wouldn’t stick to each other.

Stage Five- Making the Inside
This part is totally up to you.  The dimensions I used were 4.7 by 2.6.  I looked at a bunch of different wordings until I found this one. 
YOU ARE DONE WITH SOME STINKIN’ CUTE INVITES!

Grace, peace, and be sure to enjoy some sweets!

{Leslie}

Sunday, March 20, 2011

A Burlesque Bachelorette

I love themed parties!  This is the bachelorette party for my dear friend Kathy (I had a previous post about her shower I also helped throw).   We started things off with a little workout at the Girls Room in Frisco with a Burlesque Dance class.  We learned some really great dance moves and how to work a boa (I was terrible…I usually don’t do things that require rhythm)!  As I type this I have big band music playing in my head.  

I am one that believes party favors are essential.  I know it seems like this stopped once we got to middle school but I believe this makes everyone feel special!   If you have heard of the Love Languages you can probable guess how I like to Love.  ☺  Each girl at the party received a red boa, water bottle and a matching red ring pop.  The bride had a special bag with a white boa. 


After working so hard shaking our grove thang we were starving!  Ashley and Linds did a great job making these salads.  Lindsay made a Barefoot Contessa Pasta Salad. I definitely recommend it!
 

These were WONDERFUL cupcakes from Society Bakery. We had the Oreo, double chocolate, red velvet, strawberry, banana, and peanut butter (oh my gosh, soooooo fabulous).   It was very difficult to practice self-control, so difficult that I didn’t.  We just worked out right?!  Ashley also made this fabulous Mocktail:

Cranberry-Lemonade Mocktail
1 quart (just the normal container) of diet cranberry juice
2 litters of diet 7 up or sprite
1 can frozen lemonade
Optional:  In order to turn this mocktail into a cocktail add vodka.  


Here are some of the other decorations we had!  Ashley and I got together earlier in the month to make the “panty tree” and the pom poms.  Panties brought by all the party attendees covered the panty tree.  They have to bring a pair that represents their personality and the bride has to match the panty to the girl!  We made the pom poms from a tutorial I found on Martha Stewart’s website.  Also, this cute drawing is one my Grandmother found in Paris when here and my Granddad were based in England.  


The Bachelorette party was such a success!  It was so great hanging out with friends I have known for 12 years!

Grace, peace and be sure to enjoy some sweets(bc I wont after all those cupcakes I ate)! 

{Leslie}

Friday, March 18, 2011

Boomer Sooner-Banana Bread

After my post about breakfast options I felt it necessary to tell you about my favorite banana bread recipe.  My wonderful college (BOOMER SOONER) roommate Kristen passed this along from her sweet grandmother.  My mouth is watering as a type this post...that is how fabulous it is! 

Banana Bread 

•    1 1/3-cups canola oil
•    3-cups sugar, plus additional for sprinkling
•    4 eggs, beaten
•    6 bananas, smashed
•    1-cup sour cream
•    2 tsp vanilla
•    4 cups flour
•    1 ½ tsp soda
•    1 ½ tsp salt
•    2 cups pecans (optional)

1.    Preheat the oven to 325.  Grease 2 large loaf pans and sprinkle some sugar at the bottom of the loaf pans. (I do not own two large loaf pans so I substituted two smaller ones instead.  You could also make muffins but make sure you have a lot people who will eat some of them!)
2.    Combine oil, sugar, eggs, bananas and sour cream.  Mix.  Add vanilla and mix.
 

3.    In another bowl mix flour, soda and salt.  Slowly add flour mixture into the 1st bowl.  When all combined fold in the pecans (This is optional, I did not add the nuts because I made this for my boyfriend who does not like pecans).   
4.    Pour into loaf pans.  VERY IMPORTANT: sprinkle sugar on the top of the batter, this will create a crunchy top that is completely fabulous.  It takes all my strength not to pick all of this off ☺

5.    Bake 45 – 60 min depending on what kind of pan you are using.  Towards the end of baking monitor how dark the top is getting.  Sometimes I have to cover the top with tin foil to finish the baking process.  Allow bread to cool for 20 minutes before trying to take out of the pan. I do recommend cutting yourself a slice while it is still warm.  Just add a little butter and a glass of milk! Mmmmm Yummy!


Grace, peace, and be sure to enjoy some sweets! 

{Leslie}

P.S. Writing out a recipe was more difficult than expected!  Any suggestions/advice would be much apprieciated :)

First things first!

One of my favorite things to do is sleep and a close second would definitely be eating.  In the morning this causes quite the dilemma…to sleep longer or get up and eat breakfast?!  For the past year and a half I have chosen sleep and consequently have eaten instant oatmeal for breakfast everyday.  This is not necessarily an unhealthy option but I know I can do better! I have been on a health kick lately; I am trying to be more focused on what I am actually putting in my body not just the calories.  With that being said I have discovered breakfast can be a great way to start the day and if I actually eat something nutritious I wont be starving 30 minutes later.   Here are three of my new options that are not only healthy but are fast and easy.  I hope one of these will seem doable for you and helps you start your day off right! 

Option One:  The Hearty Person, Eggs.   (Approx. 200 calories)

•    1 egg
•    2 egg whites
•    1/3-cup bell pepper
•    2 pieces of turkey bacon
•    Salsa (I personally love salsa and could have it with every meal)
•    Salt and Pepper to taste

1.    The great thing about this option is you can assemble it the night before!  I scramble the 1 egg, 2 egg whites, and 1/3-cup diced bell pepper in a Rubbermaid and refrigerate over night.  Feel free to be adventurous and add other things to spice things up! 

2.    In the morning between blow drying my hair and straitening it...I have a strict routine…I place the egg mixture in a skillet on the stove (be sure to use cooking spray) and cook the turkey bacon in the microwave.  I leave the kitchen to finish my hair and when I return the eggs are starting to bubble and the bacon is done.  While I wait for the eggs to finish I tear up my cooked bacon and place it in a bowl with lots (yes, that is a measurement) of salsa.  Salt and pepper your eggs and then add to your bowl!  This “recipe” is extremely fast and I am full for hours. 

Warning:  I am extremely low maintenance person and straitening my hair does not take a long time.  Please do not burn down your house because I told to leave your eggs cooking while your finished your hair. 

Option 2:  The Wholesome Person, Apple Oatmeal.  (Approximately 250 calories)
•    1 apple, diced and divided
•    ½ cup oatmeal
•    1 cup water
•    2 tsp brown sugar (splenda does have a lower calorie version)

1.    O MY gosh… I will never eat instant oatmeal again.  This is phenomenal.   Again, after I blow-dry my hair I start boiling 1-cup water and half of the diced apple.  Place the other half of the apple in a bowl and toss it with the brown sugar.

2.    By the time I finish my hair the water is boiling.  Place the oatmeal in the boiling water and occasionally stir for about 3-5 min.  When oatmeal is finished pour it into your bowl that already has the apples and brown sugar.  Stir and Enjoy! 

Warning:  If you eat this you will not be hungry for hours.  This was a strange phenomenon to me…you are not dying or coming down with something…this is the feeling of eating real-non-processed food for breakfast.

Option 3:  The Greek Goddess  (Approximately 160 calories)

•    1 container of Dannon 0% greek yogurt
•    ½ cup blue berries
•    1/3 cup Special K: Multigrain Oats and Honey


Mix all above together...devour. 


Grace, peace, and be sure to enjoy some sweets!

{Leslie}

Saturday, March 5, 2011

Bridal Shower

My sweet friend Kathy is getting married!  Kathy and I go way back…back to the days where the coolest place to eat was Chili’s and I would sometimes print instant message conversations from guys I was obsessed with(i might still have those somewhere).  I LOVED helping host this shower.  I will now apologize for my photo taking/editing ability.  I’ll be honest my camera only cost $80 on a before Christmas sale 5 years ago.  I am trying to not allow myself to just go out and buy a new camera because I am starting a blog.  With that being said if you have any suggestion for a high quality/low cost camera I would really appreciate it(pictures are important right?!). Here is the invitation we used.  We ordered the jpeg from ETSY and printed them our selves.  I have searched ETSY over and over and cannot find them now :(  If you can find this woman's shop I would definitely recommend using her.  She worked very fast and the printed image looked great!  We also ordered the recipe cards that matched and everyone attending sent us a sweet and savory recipe for the bride.

This is some of the food we had!  Food should always be a priority when planning a shower.  Always.   


The shower was great!  I cannot believe we are old enough to be getting married. It seems like yesterday all 4 of us were eating ice cream out of the carton because we didn’t have dates to the Valentines dance!
  

Grace, peace, and be sure to enjoy some sweets.

{Leslie}

Thursday, March 3, 2011

My New Adventure

Dyslexia.  seY, I mean…Yes,  that is all that is coming to my mind right now.  My flashbacks to English classes are starting to make me sweat.  I feel like you need to read this disclaimer before you venture into my blog.  Written communication is not one of my strong points, you are probably asking yourself “you know your starting a blog, right?!”  In the past 3 months I have been floored by the amazing creativity of so many blogs, I did not even know this world existed.  This discovery is ranked high in my “favs of 2010.”  If you were curious what some of the other discoveries here you go:

1.    Did you know when you register your Starbucks card you get your latte for almost $1 less!  This might not be much money for some people but when you have an unhealthy addiction like me...it is pretty fabulous. 

2.    Jeggings.  These have changed my world.  I bought mine at Jcrew and Old Navy.  Normal jeans now feel like cardboard. I am wondering if I should go stock up on more because if these are not sold next winter I will have some serious issues.  


As you read this (or am I just might be ranting to myself…) you might be wondering what is this blog going to be about?  What does Leslie have to write about?  That is a great question and to be honest I have no clue.  All the blog help sites I read suggested that your first step to blogging be to find a purpose.  God has given me too many things that get my heart racing to just talk about one.  So do not be surprised if I write about décor, parties, crafting, baking and then write about my new favorite exercise.  I am so excited about this new adventure!

Grace, peace, and be sure to enjoy some sweets, 


{Leslie}
Related Posts Plugin for WordPress, Blogger...