photo HEADER2_zpsztxreyz7.png

Sunday, March 24, 2019

Refinished Kitchen Table


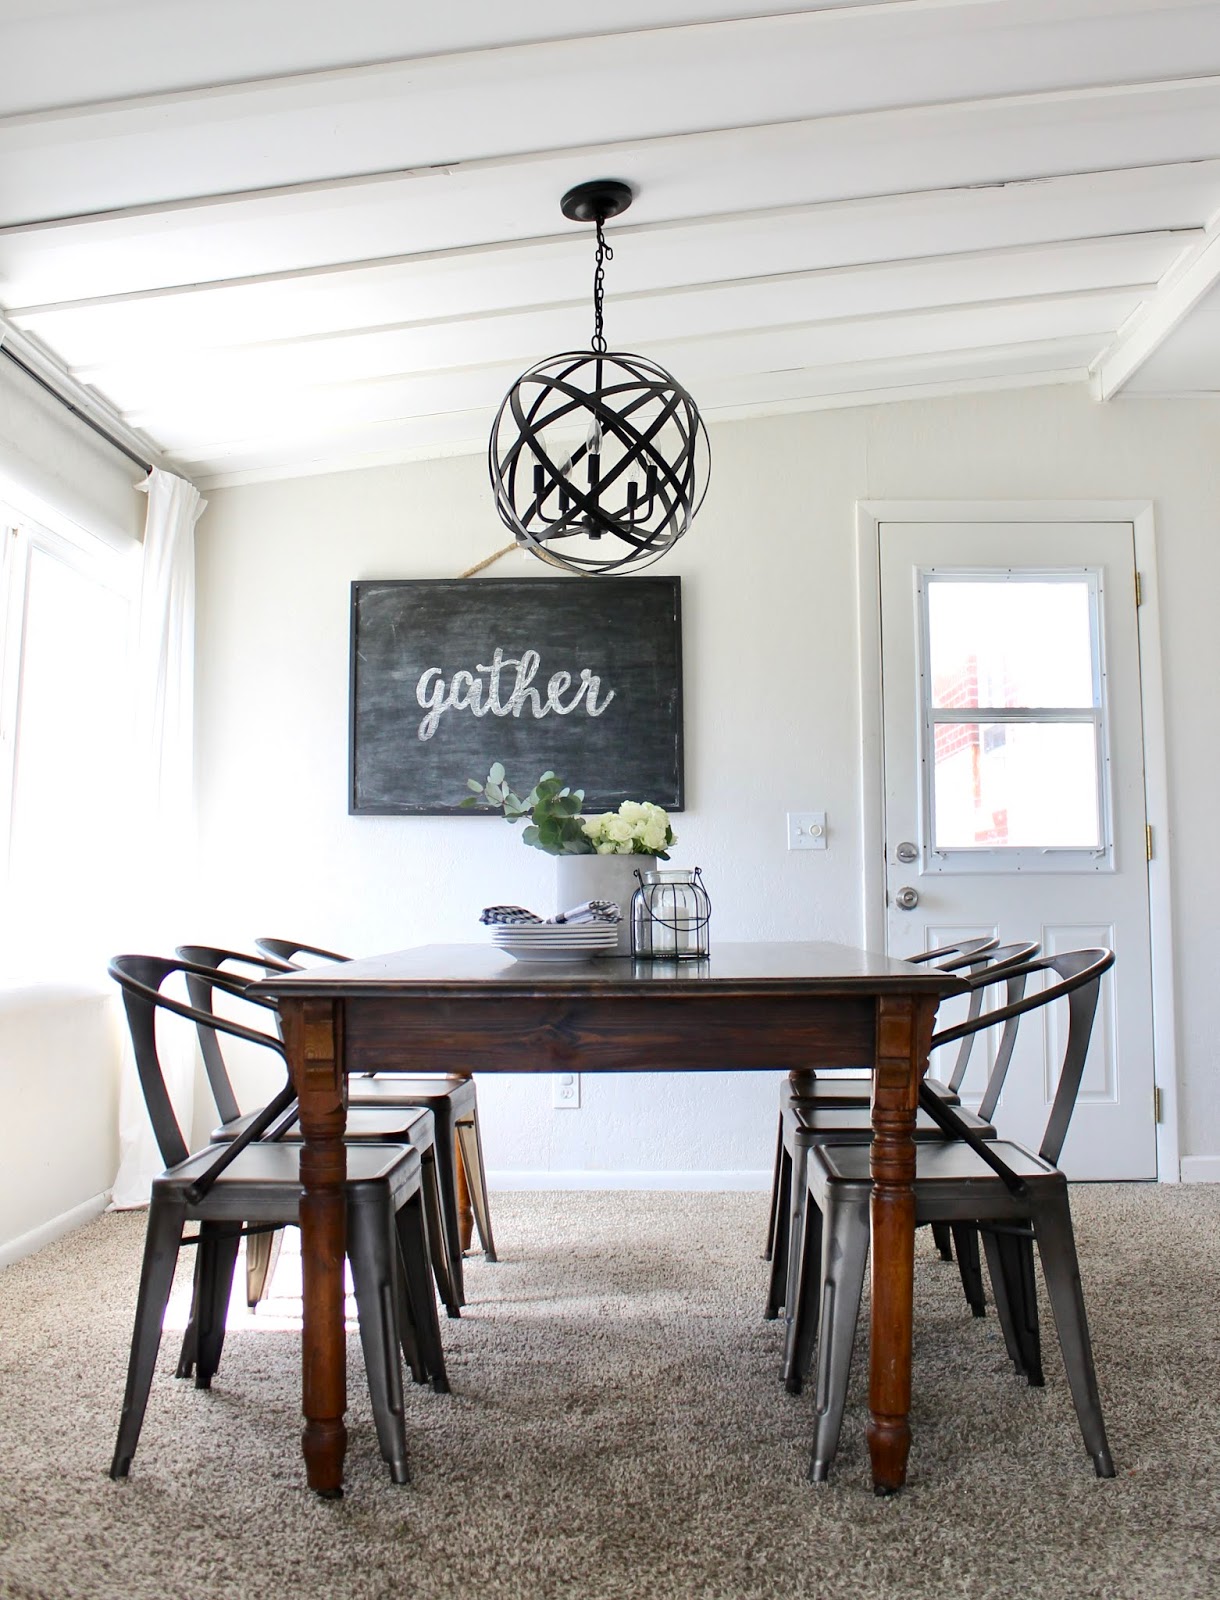
Hi y'all!  I am so excited about our new table!  It was Christmas time when I realized we were outgrowing our old table.  #goodbyenewbornfog  I kept my eye out on facebook marketplace and Craigslist, and when this table popped up for $20, I jumped!


It's hard to see in this picture but the top was covered in scratches.  I also did not love the orange color, so deciding to refinishing the table was a no brainer!  I always follow 5 steps when refinishing and here is a super quick recap!

1.  Paint Stripper!  This step is so stinky and messy but it makes sanding SO much easier!   I use the quick 15 minute gel stripper.


2.  Sanding! AKA Worst Step Evvvver.  I'm trying to be more honest in my 30s so no sugar coating from me.  😝  I always start with a 60-80 grit sand paper to get most of the old stain off.  Then smooth out the table with 120 grit sandpaper followed by 220 grit sandpaper.  I usually use a palm sander but the wood on this one was so hard.  I had to break out our belt sander.  It worked so much better but also left some deep marks where I held it to long.  I think it just makes it look more authentic!

 
3.  Pre-Stain!  Give yourself a pat on the back because the hardest part is over.  Using an old cloth, wipe the pre-stain all over the table.  This will help the stain absorb evenly all over your table.  Also, don't worry when your table looks yellowish... it will go away when you apply your stain!  
 
4.  Stain!  Using a rag or brush apply stain.  Wipe off any extra stain after about 15 minutes.  I did 2 coats of dark walnut stain.  

5.  Polyurethane!  Time to seal your table!  Using a good quality brush apply polyurethane.  I use Super Fast Drying Polyurethane from Minwax.  Between each coat of polyurethane you want to lightly sand with 220 grit sandpaper.  I do a total of 3 coats of polyurethane.  


 DONE!  I switched out the original legs for some antique legs I had been saving for something special.  I'm over the moon happy with how they look! 


Now I have to convince Tall Tan Man that we need new chairs!  I'd love a long bench with some different chairs...  The problem is he thinks I can do everything for $50 and I just can not finagle that!

 
The boys and I are flying to Texas today, wish me luck and send me allllllll the antiperspirant! 😅  

post signature

Friday, March 8, 2019

DIY Painted Vase


Hi y'all!  Man oh man, I feel like I am starting to feel like myself again annnnnnd a bigger hot mess than ever.  Please tell me I'm not alone... #motherhood I'm giving myself a pat on the back for already showering three times this week!  I can give you a high five because I smell ok!  😂  Now that I have scared half of you away, I am going to share one of my latest DIYs.  

Our tall dresser in the master needed something big on it and I fell in love with a vase that Chris Loves Julia shared.  It was $90 dollars.  NINETY DOLLARS!  No way jose.  You know how much I could get for that Homegoods?  Target?  So much!  Anyway, the vase seemed simple enough for me to DIY and when I was at Ikea looking for kitchen organizers I found this:


Perfection!  Twenty bucks and I was sold!  I decided to paint the inside of the vase because I do not plan on putting water in it.  After making sure the vase was super clean I taped a line a little less than half way up.  


I gave the vase about 4 thin coats of paint {that I already had in the basement} and removed the tape before the paint fully dried.  


How do y'all think it compares?!


Our bedroom has been a constant work in progress since we moved in.  The problem with just doing a little here and there is that it doesn't always go together...  Or I buy something that I like "ok" but after 6 months I want to throw it in the dumpster.  Ever since I {refinished my grandad's dressers} I have been going crazy to finish the room.  


My biggest problem with the space is our bed.  The headboard doesn't seem to work anymore, I have pillow inserts on the bed with no covers, and every nightstand I've bought doesn't work.  My goal was to get all this figured out in March so if you are interested following along with me find me on insta!  
post signature

Friday, March 1, 2019

8 Month Old Levi


How in the world is it already March?!  2019 seems to be blazing by and at the same time this winter seems never ending...  Every winter Sean thinks I've lost my mind because "I'm not acting like myself."  Well honey, this Texas girl thinks spring starts in February and for some reason that's not how Colorado works... 😭  Thankfully #fingerscrossed Levi has been healthy and happy!  We went to the doctor yesterday and he is 29.5 inches long and 18ish lbs.  He's pretty much Mack 2.0 when it comes to being long and lean.


8 months and 27 daysssssss


Levi has started eating more solids this month.  Praise the Lord, I can see the end of breastfeeding!  He loves peanut butter, graham crackers, and eating pouches by himself.  

I had to ask the doctor about him not really wanting to move STILL.  I feel like I have said this for 3 months but I am trying to not FREAK OUT about him not moving.  Maybe he is lazy?  Or content?  Content is a better word.  😂  I thought Mack was normal but I am beginning to think {thanks to Dr Google} he was advanced in the gross motor department.  It is just really hard because Levi is acting like Mack did at 6 months.  Like I can leave him on the bed and not worry about him crawling/rolling off... I told Sean if nothing has changed by 10.5 months I'll probably have him evaluated...  I'm just praying that he all of a sudden decides he wants to get moving.  

I'll probably regret that statement someday... 🙏


I've already started brainstorming Levi's 1st birthday and it will be his golden birthday {June 1st}!  Have you seen any cute gold boy birthday parties?  Glittler just seems to girly for me... Help!

post signature
Related Posts Plugin for WordPress, Blogger...