photo HEADER2_zpsztxreyz7.png

Thursday, March 26, 2015

DIY Concrete Desktop


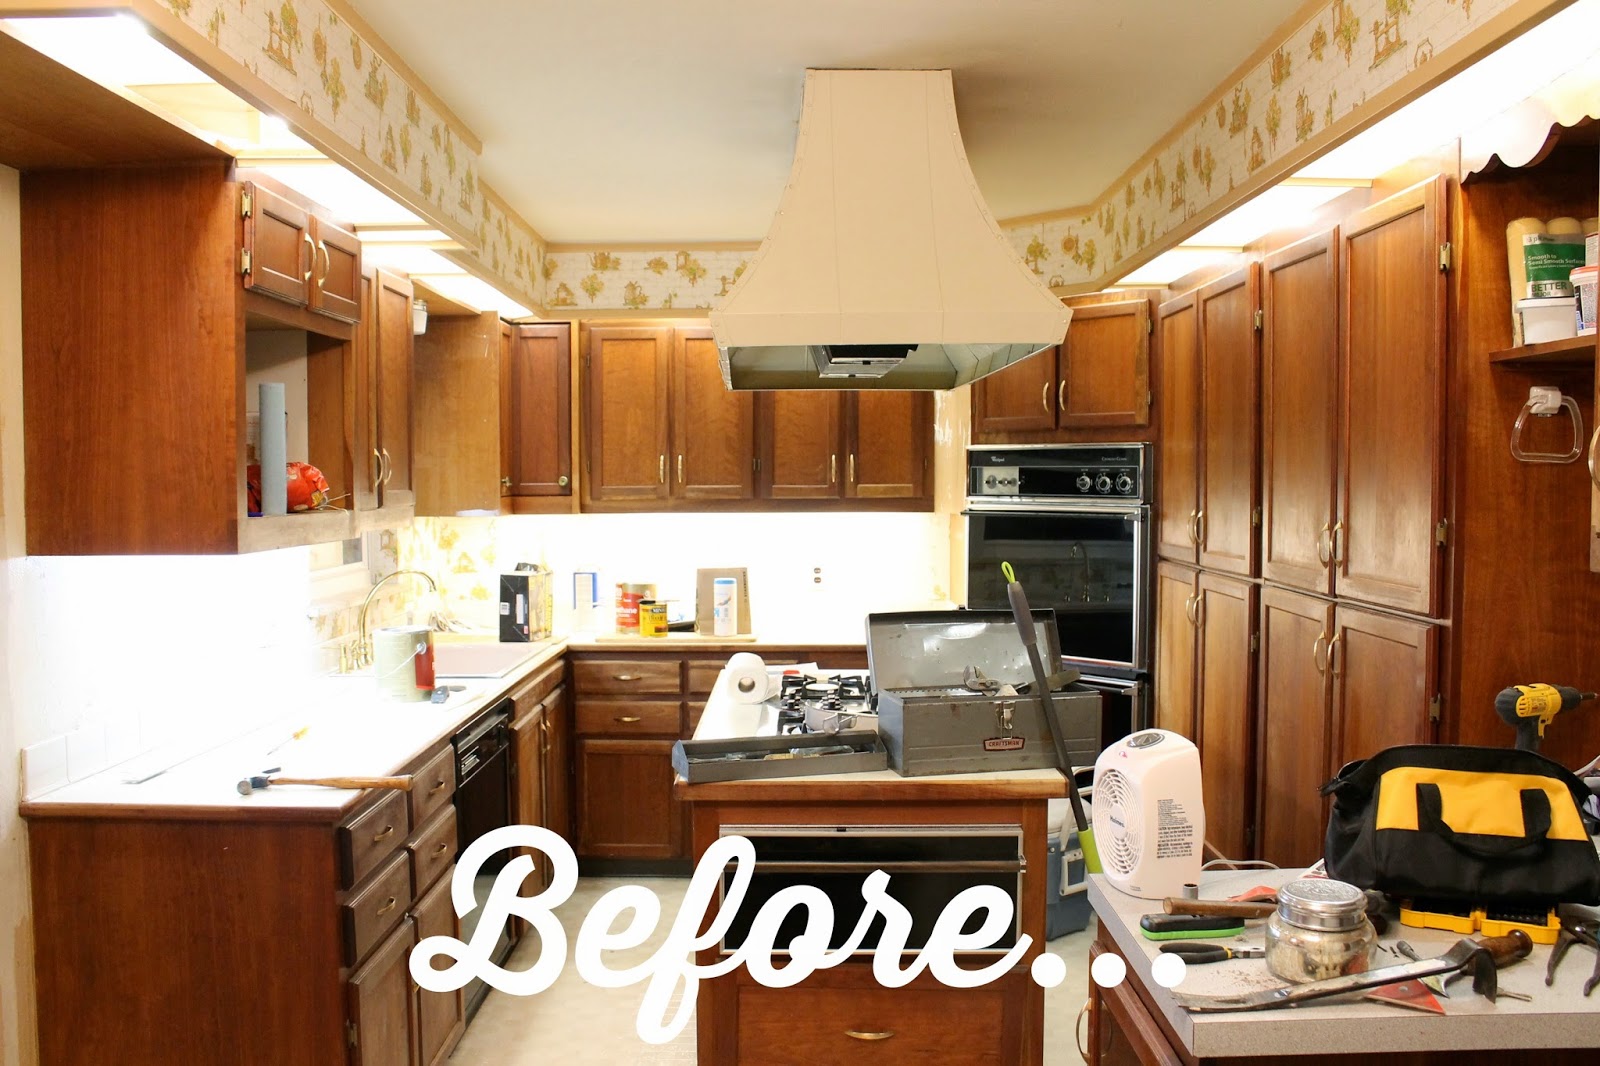
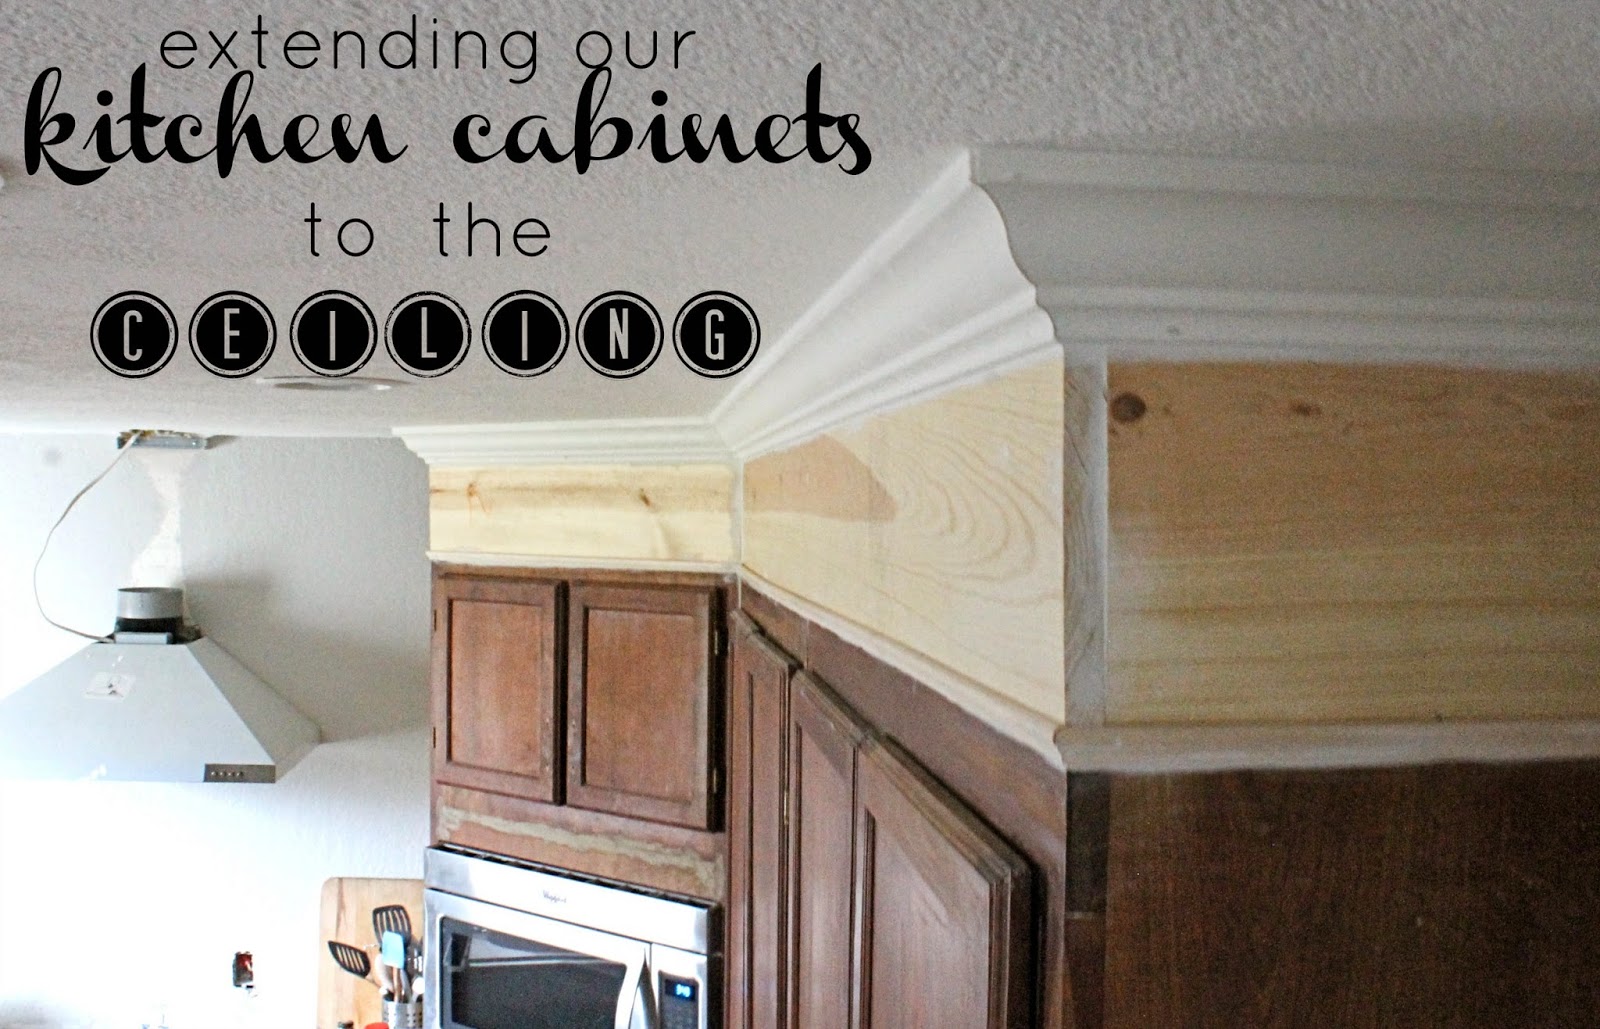
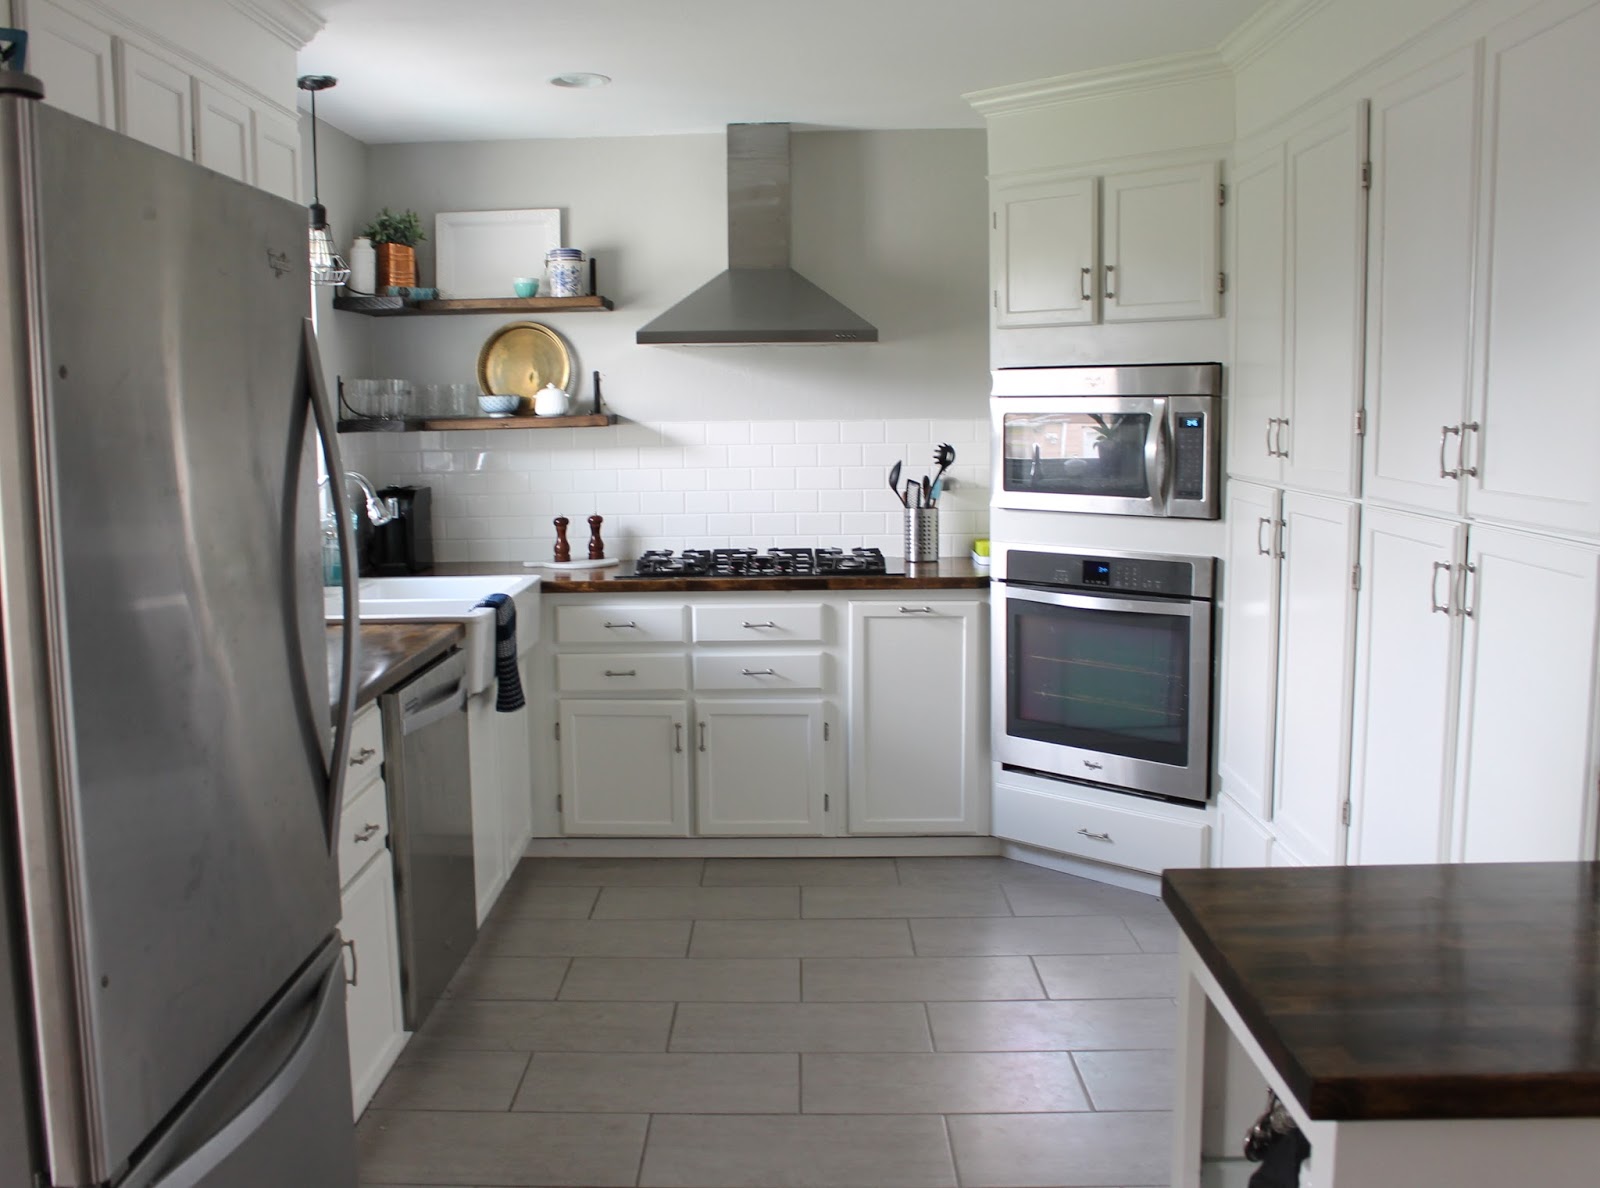
 Hi friends!  If you follow me on instagram then you know I have been a LITTLE busy working on our kitchen.  I have been covered in dust, paint, and dirt for the past four days.  Painting our kitchen cabinets is definitely the biggest {& most exhausting} project I have ever done.  Now we are just waiting for everything to cure before we put all the cabinets and drawers back... tick tock tick tock... 

Last summer, {yes, last summer},  I decided I wanted to make an outdoor table with a concrete tabletop.  Here was my inspiration from {Pottery Barn}:


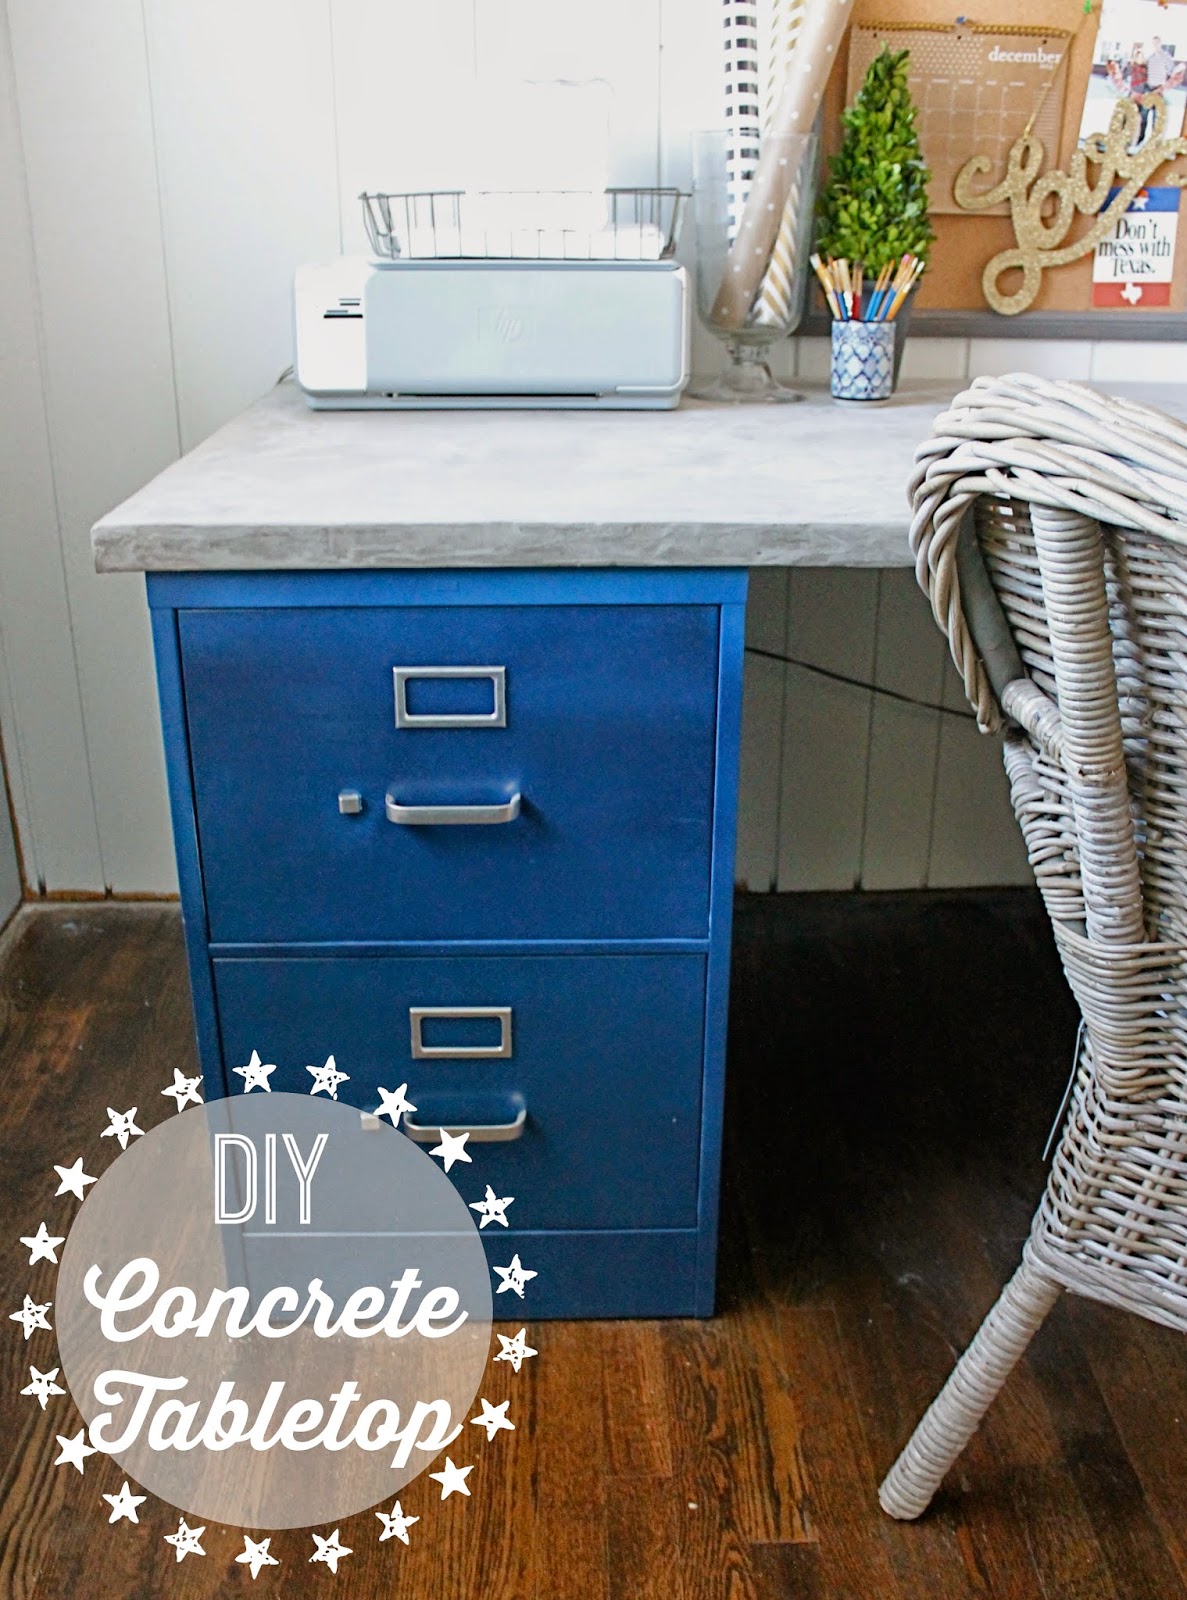
 There was NO way I was going to spend $2000 on an outdoor table.  I ended up making the concrete tabletop while we had a covered patio in our rental, and then two weeks later our 11th house offer was accepted. I love our house but we do not have a covered patio, and that is is why we now have a concrete top desk.  I am always an over-sharer.  I used tutorials from {Little Green Notebook} and {Kara Paslay} as my guides during this projects.

DIY Concrete Tabletop

Supplies:

Hollow Door
Putty Knife
Concrete Trowel {like this, I tried a drywall knife but I didn't like it}
Buckets
Big Sponge
Sandpaper {60, 120, 220}
Concrete Sealer & Brush

*You will need to find a local distributor. 


First, rough up your door with the 60 grit sandpaper.  Now mix up the concrete according to the package.  I added a little bit of extra water to help with the consistency. 


Next I added the concrete to the door with the drywall knife. I was a little bit nervous using concrete, but it was very easy to work with!  On the third round I discovered using a concrete trowel was MUCH EASIER.  Goodbye, drywall knife... 


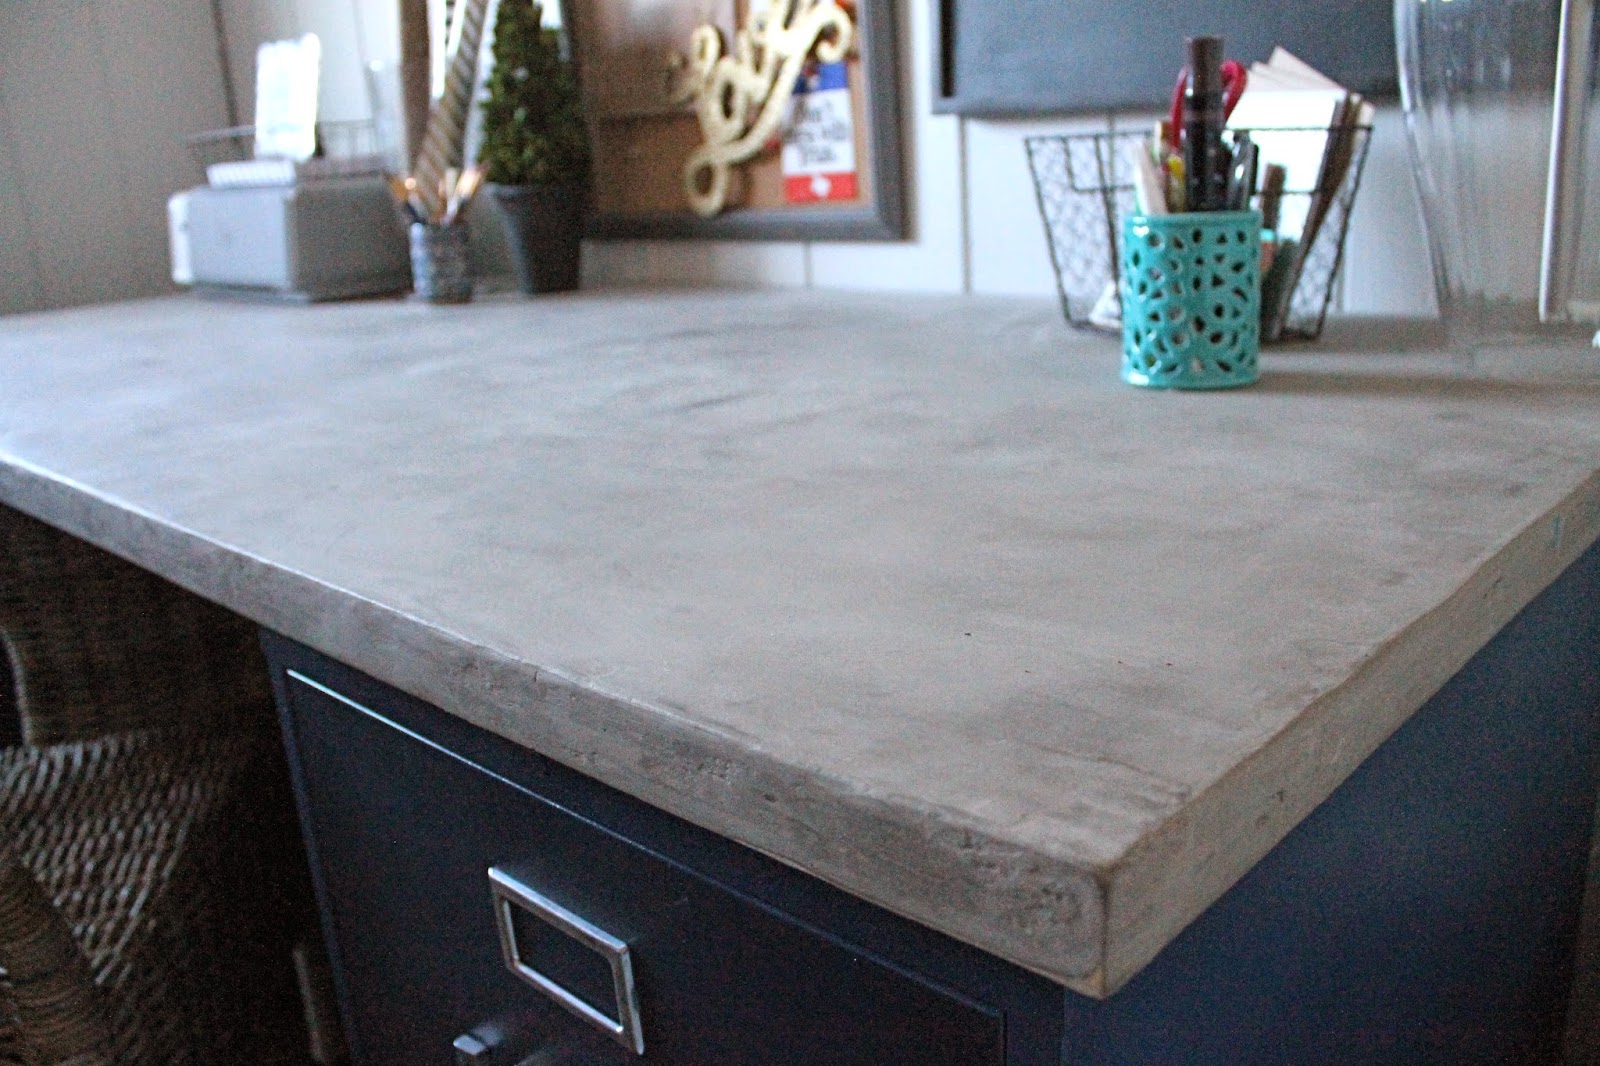
After your concrete dries you want to sand the table until it is smooth using the 120 grit sandpaper.  Now add your second coat of concrete and this time cover the edges. Make sure you use a putty knife on the bottom of the table to get a somewhat clean edge. :)  ***I was still using the drywall knife but I should of been using a trowel and sponge. 


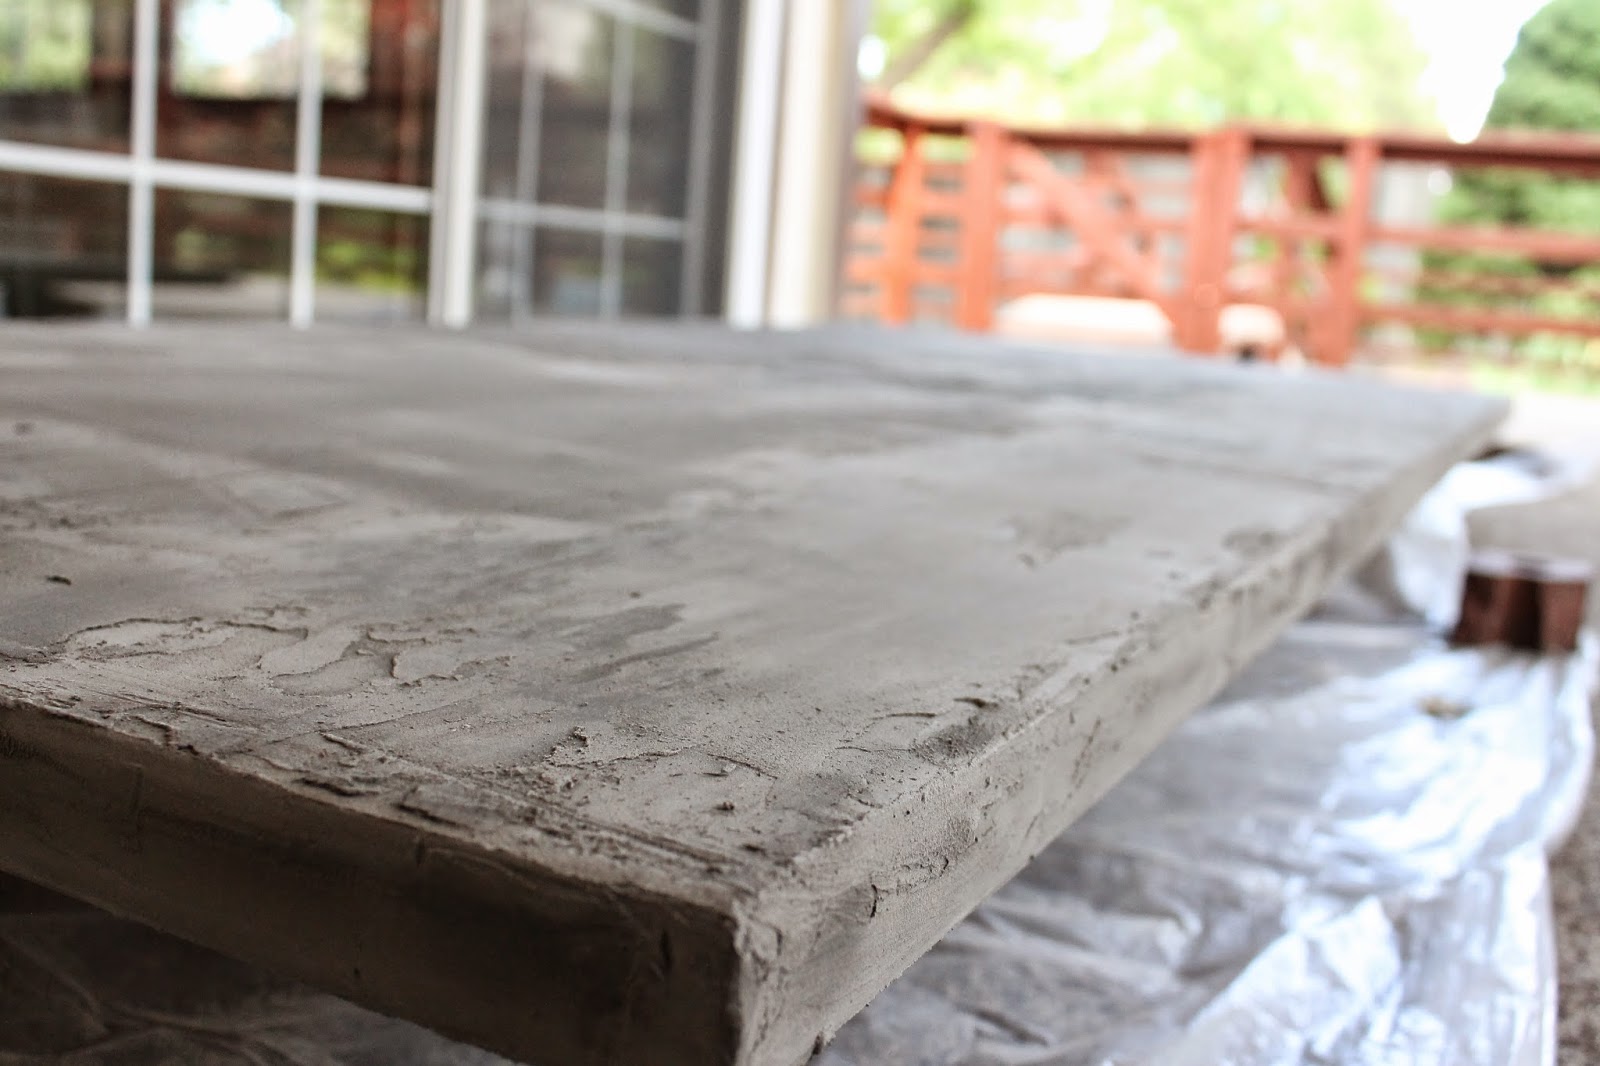
Use your 120 sandpaper again until the concrete smooths out again.  On the third round of concrete Tall Tan Man's cousin taught me a MUCH better way to spread concrete.  First off, don't be afraid to add more water directly onto the table.  Second, use a sponge!  Holy cow, this project just got a million times more AWESOME!


Now you can leave the texture from the sponge or you can go over the table with 220 grit sandpaper.  Lastly, seal your table with concrete sealer twice. 


This might be one of my favorite projects, ever!  If there is ever a next time I would definitely use the sponge on all three applications of concrete.  I would also not be as afraid of pouring water on the table except during the first application.   


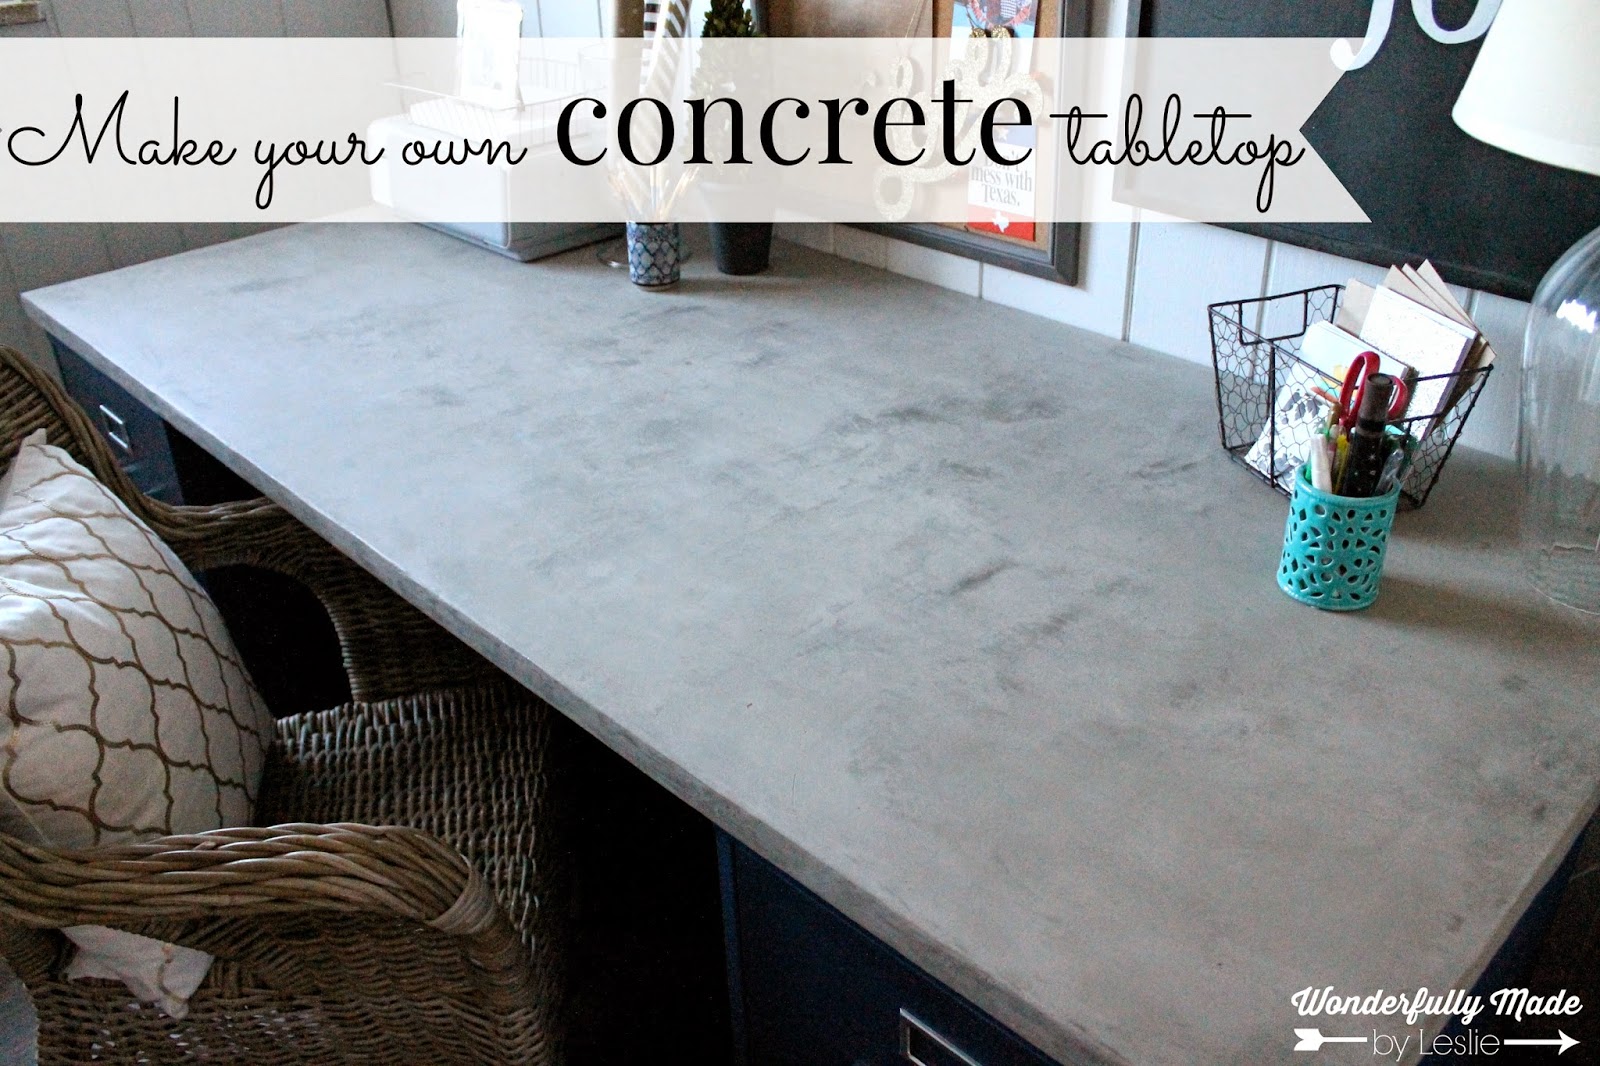
One last thing I want to mention is that the concrete has character.  Originally I wanted an even gray finish, but that is just not how this concrete works. I ended up loving how the table looked!


I hope you are having a great week!  I am headed up to the mountains to see some of my favorite people!  Wooo hooo

{LJ}

Linking Up to:
Artsy Fartsy Mama 
Shabby Art Boutique
Miss Mustard Seed 
Pieced Pastimes
Gingerly Made 
I heart nap time  
DIY Showoff 
It's Overflowing 
Monday Funday 
Crafty Blog Stalker
The Blissful Bee
Whipper Berry

Friday, March 20, 2015

Extending Kitchen Cabinets to the Ceiling


We have some REALLY EXCITING things going on in the kitchen right now!!!  I can barely contain my excitement.  :)  I showed you that picture to make sure you remembered where we started...  


Removing the island made the room look so much more open. You can see more detailed progress posts {here and here}.  Unfortunately, I still felt like there was something missing from the room.  After a couple debates and a lot of google searching we decided to extended the cabinets to the ceiling.  Tall Tan Man started by attaching wood blocks {he used a 2x2} 3/4 inch away from the edge of the cabinet. 


He also attached blocks to the ceiling that were the same distance from the edge of the cabinet.  


Next he used his favorite new tool, a nail gun, to attach 1x10's to the wood blocks.  We were really lucky, because we had exactly 10 inches above the cabinets to the ceiling. 


For the first time since we moved in our kitchen actually felt like it was coming together {even if it was just a tiny bit}!


Up next he added trim to hide the seam between the cabinets and the new wood.  


We bought the trim at Home Depot, AND for the first time in my life the trim I wanted was the cheapest one.  :)  We also bought the crown molding at Home Depot.


Tall Tan Man loved every moment of it...


That stud muffin only messed up on one cut {and it was his first cut}!!! 

  
Lastly, TTM went through and caulked the trim and molding. 


Guess what...  Everything is getting painted over SPRING BREAK!  Guess what...  I am on SPRING BREAK!  I really love being a teacher {seriously, I do}.  I have been telling people that we are painting the cabinets white and I have gotten two reactions.  


Oh, they are going to look amazing!!!
&
You are painting the wood?

Yes, I am PAINTING the wood and it is going to look AMAZING!  Please let me know if you have any questions about this post.  I hope you have the happiest of Fridays!   

UPDATE!  Check out our {kitchen} now! 


{LJ}

linking up with:
Shabby Art Boutique 
Pieced Pastimes
Gingerly Made 
DIY Showoff 
It's Overflowing 
Karen's Up on the Hill
Monday Funday
The Blissful Bee
Artsy Fartsy Mama

Wednesday, March 18, 2015

Cabinet Makeover


I love furniture that can evolve with my always changing taste.   We got this {craft cabinet} last year off of Craigslist, because our apartment {I} needed more storage space.  Now we have an {office} that I LOVE and no longer need the storage space!  I am so excited I get to share this second makeover with y'all!  ***If you are first timer to the blog, our house is under major construction.  Please try to ignore the awful floor...


I have wanted to paint the inside of a bookcase since I pinned {this} beauty TWO years ago...


Pretty dreamy right?


Our sun room is still a work in progress, but this new cabinet is helping make the room look more homey!


I hope you have a great rest of your week.  :)  We are half way to Friday!

{LJ}

linking up with:
The Blissful Bee
Miss Mustard Seed
Shabby Art Boutique 
Pieced Pastimes
Gingerly Made 
DIY Showoff 
It's Overflowing 
Karen's Up on the Hill
Monday Funday
Artsy Fartsy Mama

Saturday, March 14, 2015

Butterfinger Pie {Happy Pi Day}


Woooo hoooo!!!  If you know me well then you know I love math, and if my know me really well then you know Butterfinger is


I love dessert in all forms, especially pie.  Two years ago I made this {Chocolate Peanut Butter Pie} for the first time.  I have made it MANY more times since then.  It is so yummy and for an added bonus it is a skinny version!


Last year was all about the {Key Lime Pie}!  I am real excited thinking about this, because I am about 90% sure we are going to Key West this summer.  


Butterfinger Pie
{South your Mouth}

Ingredients:

6 Butterfinger Bars Chopped {1/2 cup reserved}
1 - 8oz Package Cream Cheese, room temperature
1/2 Vanilla Extract
12 oz Cool Whip, thawed
9 inch Graham Cracker Crust

Directions:

1.  Beat cream cheese and vanilla until light and fluffy.  

2.  Add half the cool whip and mix until smooth.  

3.  Fold in the chopped Butterfinger and remaining cool whip.  

4.  Top with remaining 1/2 cup Butterfinger and refrigerate for 2 hours before serving. 


This might be my new favorite Pi day pie!  SO DELICIOUS!  Cream Cheese + Butterfinger + Graham Cracker Crust.... Can't go wrong!  This summer I plan on trying to make this again but with heath bar or snickers.

I am off to bootcamp to burn some calories!  HAPPY PI DAY!!!

{LJ}

Sunday, March 8, 2015

Where I buy flowers...


There are two things in this world that I wish I could have all the time...  1.  manicured nails 2.  fresh flowers.  There is just a little thing called a budget that I try to stick to, sometimes...  Fresh flowers in the house just makes me feel like Southern Living is coming over to do a photo shoot {a girl can dream, right??}.  My favorite place to get flowers is our local grocery store, King Soopers {Kroger}.  In the back corner of the store there is a clearance section that always draws me in! 


At those prices I can afford to have flowers in my house almost all the time!


Greenery is always a cheap {$6 bucks} and a long lasting option that freshens up a room. 


My second favorite place to buy flowers is Trader Joes.  If you are lucky enough to have one of these stores locally then you have to check out their flowers!  So cheap and beautiful!


I am going to have a great week because of all sorts of fresh flowers in the house.  :) The SPRING BREAK countdown is on, TWO WEEKS! Holla!!!


{LJ}

Linking Up with:
Craft Blog Stalker

Tuesday, March 3, 2015

Overnight Oats {Easy & Healthy Breakfast}


Hello!  Is anyone still sticking with their New Years resolutions?  If you are then you should give yourself a pat on the back or go buy some new lulu lemon pants, because it is MARCH! Holla!  I have been eating this {egg casserole} for the last two months and I decided I was ready for a change. 

Raspberry Overnight Oats
Adapted from Skinny Taste

Ingredients:

1/4 cup quick oats
1/2 cup 1% milk
1/2 tbsp flax seed 
1/2 cup raspberries
2 Truvia
2 pinches of cinnamon
1 tbsp chopped pecans

Directions:

1.  Combine all the ingredients except for the chopped pecans in a mason jar.  Shake until combined & refrigerate overnight. 

2.  In the morning microwave the jar for about 1 minute then add the chopped pecans {you do not have to microwave your oats, but there is no way I am eating cold oats when it is 7 degrees today}.  

3.  Enjoy!

We are hunkering down for another winter storm, yaahhaay!  I hope y'all have great rest of your week :)

{LJ}

Linking Up with:
The Blissful Bee
Living Well Spending Less
Craft Blog Stalker
A Peek into my Paradise

Sunday, March 1, 2015

Weekend in Winter Park!

Happy Sunday! We just had an AWESOME weekend in Winter Park.  Are you jealous?!


God created some mighty beautiful sights for us to see! We spent one day skiing and a half day tubing.  I definitely recommend the tubing in Frasier.  :)


Tall Tan Man and I spent the weekend with my bestie Sarah and her new fiance {can't wait until September 5th}! I really love when my friends come to see me... It has been hard making girl friends since moving to Colorado.  We also ran into one of our college roomies, Jill, on the mountain!
  We ate lots of good food on the trip.  So much that I woke up with a stomach ache on Sunday...  We definitely recommend Hernando's for pizza/pasta and Azteca for decent Mexican food {good Mexican food does not exist outside of Texas, I just confirmed my Texas pride there}. 
 Alright folks, back to the real world tomorrow!  Fingers crossed that all the pizza/chips/wine did mess with my {new year's resolutions} and my weigh-in on Thursday goes well...


{LJ}

Related Posts Plugin for WordPress, Blogger...